Saturday, 16 March 2013

Wire Flower Topper

Hi Everyone

Hope you're managing to stay warm despite the horrendously cold weather - a good excuse for staying indoors and crafting! :)

 
Here's how you can create a wire flower card topper like the one pictured above.


Step 1. Wrap 1mm wire around the Efco roller tube 5 times,
leaving approx 2-3 inches of excess wire at either end.


Step 2. Slide the wire off the tube and holding the rings secure
in one hand use jewellery pliers to put a kink in them.


Step 3. Carefully fan the rings without distorting them too much.


Step 4. Take the excess wire from the top and, wrapping it
around to the back, thread it up through the middle of the rings.


Step 5. Hold the rings secure in one hand whilst you use
pliers to pull the wire tight. Wrap the wire around the rings a
second time, again pulling tight.


Step 6. Take the other wire end and start curling it into a spiral.


Step 7. Keep curling it until you have used up all the excess wire.
Then fold it up and over the front of the flower in the centre.


Step 8. Turn the flower over and trim the excess wire from the end
used to bind it. Use pliers to tuck the cut end into the back.


Step 9. Take a length of green 1mm wire and bend it in half. Thread
the ends through the bottom petals either side of the centre.


Step 10. Twist the ends together a few times.


Step 11. Take one wire and wrap it once around the roller tube.


Step 12. Twist the wires together again a few more times
without removing the roller tube.


Step 13. Slide the wire off the roller tube and use jewellery pliers
to put a kink in the ring.


Step 14. Repeat the process to create another leaf
on the other side of the stem before twisting the wires
a few more times and trimming the excess.

As you can see it's very easy to create the wire flower and stem. Then all you need to do is fix it to your card - I used a hot glue gun.

Happy Crafting

Fee x

Friday, 8 March 2013

Tissue Paper Flowers

Hi Everyone

It's Mother's Day this Sunday so why not get the kids making some tissue paper flowers for all those wonderful ladies that have one of the hardest jobs on the planet...


How to make them...
Cut at least 8 rectangles of tissue paper.
(There are 14 approx. 15 x 25 cm pieces pictured here.)

Stack the pieces of tissue up and fold them in a concertina fashion
 (These have been folded at approx 1.5cm.)

Take a piece of green 1mm wire and wrap it around the centre of the folded tissue. Twist it to secure the tissue.

Trim the ends of the tissue into rough petal shapes.

Cut down the folds of the tissue paper to lengthen the petals.
(These have been cut approx. 2.5cm.)

Pull the two ends of the tissue paper sections round until they meet.

Carefully tease the first layer of tissue paper petals up to the centre.

Continue in a similar fashion with each layer of tissue paper.
(Don't worry if, as it starts to fill out, you tear an odd petal or too.)

If a stronger stem is desired, take a piece of 2mm green wire and hook this over the centre of the paper concertina and wrap the ends of the 1mm wire around to secure it.

As the flower starts to fill out, start at the other end by teasing the bottom layer of tissue down and work back towards the middle.

When all the layers of tissue have been separated shape the flower with your hands, teasing petals into position where necessary.

Your finished Mother's Day flower!

These flowers are simple to do and a lot of fun to make so...

Happy Crafting!

Fee x

Wednesday, 20 February 2013

Stitches Show 2013

Hi Everyone

What a great show! Everyone was so enthusiastic about the wet felting and of course Efco's fabulous new coloured wires! Here's a photo of the stand - the calm before the storm - as I was practically mobbed the first couple of days...


 I've lost count of the number of felt flowers and beads I ended up making over the course of the 3 day show! Everyone was so lovely and there was a really good buzz! I must say I think my felted poppy proved to be the most popular...


 If you want to know how to create your own check out the Felt Flowers project sheet or, alternatively, 'watch this space' as I will be filming a short video on how to make felt poppies very soon (in fact, just as soon as my new lights arrive!).

At Stitches Efco were also showing their new range of Papp Art alongside their EfcoStone acrylic paints which are great for creating fake stone effects!

This is the large heart bag from their set of three.
It has been painted with gold Efcostone and decorated with a felt poppy and leaves.

This is the large pot again from a set of three.
It has been painted with their crystal quartz Efcostone and decorated with an ivy vine & sunflowers.

The front of this 'LONDON' Papp Art has been painted with white Decoupaint whilst the rest was covered in Lava Efcostone. Efco coloured micro beads were then stuck on the front.

This Eiffel Tower Papp Art has been painted with black Decoupaint and then patches of metal leaf and anthracite Decoupaint Patina applied.

This is the small heart bag from the set of three.
Efco relief paste was applied in thin patches with a spatula. When dry it was base-coated with white Decoupaint. Pink Decoupaint was applied with a baby wipe to give it a patchy finish. The cupcake motif was taken from a napkin and stuck on with Matt Mod Podge.

For a softer, smooth finish apply several coats of Matt Mod Podge before lightly sanding with wet sandpaper.

This is the middle sized heart bag which has been painted with white Decoupaint before Efco Creative Paper Tapes were used to create the striped pattern. The embellishment was created by folding lengths of tape back on themselves and arranging them in a circle before sticking the button in the middle.
With jewellery making still very popular at the moment it was obvious that retailers visiting the show were going to love Efco's new wires but I was impressed with the number of retailers who also saw the potential of their Superfine Merino Wool Tops...

This is Efco's Diamond 2mm Wire which, being auminium, is easy to bend and also very light.
It is ideal for making caged beads - a felt bead has been used as the centre for this one - and with the little 'diamond' nicks in the wire, when viewed from a distance, it almost looks as though it has beads strung on it!

The featured product for next month will be Efco's new range of coloured wires but if you can't wait 'til then here's a little something to get the creative juices flowing...
Inspired by a Camille Sharon YouTube video, this heart pendant has been created using Efco's Embossed Light Pink 2mm Wire.
 
 Happy Crafting to one and all...

Fee x

Sunday, 10 February 2013

Merino Wool Tops

Hi Everyone

This month's featured product is Efco's Superfine Merino Wool Tops which are ideal for both wet felting and needle felting! They are gorgeously soft compared with normal wool tops and have long fibres enabling you to easily create some fabulous effects when felting.

There are 20 colours in the range, all of which are available in single colour 50g packs. Eighteen of them are also available in multicolour 50g packs: the basic assortment (containing natural (white), yellow, red, middle blue and green) and six other 3 colour packs - red, pink, blue, green, brown and monochrome mixes.

If you have never done wet felting before you may feel a little daunted so here are three small projects to get you started...

F/0012M - Felted Soap

TF/0002M - Felted Beads

F/0011M - Felt Flowers

All these projects are easy to do even if you have never felted before - so why not have a go! The felted soaps are so easy to do and they make excellent gifts as the felt acts as a loofah! Once you've got the hang of making felt flowers you'll find it's an easy step up to making a felt scarf. Check out the Product of the Month page for more info.

I will be demonstrating wet felting alongside Efco's new coloured wires at Stitches, the trade craft show at the NEC. So if you own a craft shop do pop by the Efco stand (G25) to see how easy wet felting is! I look forward to seeing you there.

Happy Crafting

Fee x

Friday, 8 February 2013

Valentine's Day

Hi Everyone,

Valentine's Day is just around the corner so here's a few Valentine themed project ideas for you...

This is an Efco plywood heart shaped box.
A stencil was used as inspiration for the pattern. It was traced onto the lid with a pencil and then a pyrography tool used to burn it into the wood. A touch of red paint was picked up on a baby wipe and lightly applied over the top, intensifying at the edges and in the hearts. A hint of gold was applied to the leaves and extreme edge. Several strands of gold thread were knotted through the 3 heart shaped wooden buttons befor they were stuck on.


The sides were coloured with a baby wipe and red paint (intense at the top, fading to the bottom). Gold paint was applied on top of the red to the side of the lid and a 5mm strip of red velvet paper stuck in the middle. Red velvet hearts were punched using a Grand Calibur and Spellbinders Scallop Heart Die. 2 small cuts were made in each one to allow a gold ribbon to be threaded through before being stuck to the side of the box.

You can easily create personalised mugs using Efco's Color Dekor 180ยบC
Just punch out or cut your desired shapes, place them in water for a few moments to allow you to slide them off their backing sheet, position them on your mug, squeezing out the excess water and leave to dry for 24 hours. Then bake them in an oven at 180ยบC for 30 mins to make them hand washable. The Color Dekor comes in a variety of colours as well as Chinese Calligraphy and Black or Gold letters.

Don't forget you can decorate the bottom of the mug as well - an ideal place for a surprise or fun message!

If you are planning on giving a small Valentine's gift this year then why not make your own packaging like these delightful little bags:


Mini Valentine Bags are easy to make if you have a Spellbinders Heart Die Set and Grand Calibur machine. Just cut and emboss 2 large hearts from card and decorate them as desired. Cut a strip of card 4 x 15cm. Score and fold this in half (ie 7.5cm) and 1cm in from the edge on both long sides (see photo). Cut a small triangle from either side at the centre to enable you to fold it slightly more than 90ยบ. Use double-sided tape on the flaps to stick the strip between the two hearts and attach the ribbon handle.

If you can't find the perfect Valentine's card or just enjoy making your own unique handmade cards then here are a few quick ideas (all of which use the Spellbinders Dies)...


Run a piece of white card through the Grand Calibur in an embossing envelope and cut to size for your card. Run your card through with an Edgeabilities Die on the right front edge. (Make sure to open your card up first so you only cut the front of the card.) Take a piece of pink card and run that through with the same Edgeabilities Die and line it up with the front cut edge of the card before sticking it to the inside edge of the card. Use pale pink chalk to pick out a feature of the embossed card and attach a small piece of ribbon with a small pink brad. Stick the embossed card to the front and trim the edges. Stick a narrow ribbon down the left edge to finish.
You can use the heart dies to create small popups in your card. Punch several hearts from pink paper and fold them in half. Stick the halves back to back before sticking them in the middle of your card.
You don't have to go for a traditional folded card. You can create a pocket card by cutting out two hearts and sticking the edges together with narrow double-sided tape. Decorate the front as desired and punch out a smaller heart to write your message on before popping it inside.
You can use the Spellbinders Edgeabilities Inserts Dies to create patterns across cut out shapes as well as using them in conjunction with their border dies. Here Classic Decorative Inserts One has been laid across in two different directions and punched. A ribbon was then threaded through the holes and the ends wrapped around the stuck to the back before the heart was fixed to the card.
A very simple but effective card can be created by punching out a heart and then embossing it in an embossing folder. Punch small holes down either side and thread a narrow organza ribbon through. Tie 3 small bows and stick them over the top holes and the bottom point of the heart. Stick the heart to your card.


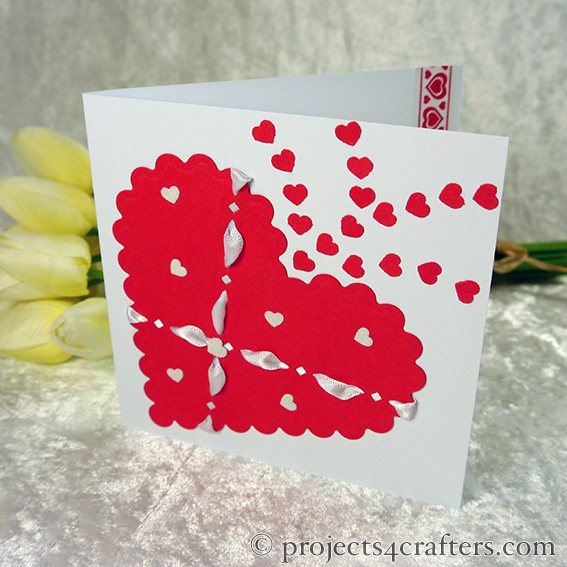
You don't just have to cut and emboss flat shapes with the Spellbinder's Nestabilities Dies either. The project below shows how, with a little simple paper folding before using the scalloped heart die, you can create a card with a difference. Perfect for that special Valentine's message! Check it out at: http://www.projects4crafters.com/Special-Occasions-Cards(2296643).htm

Be My Valentine(CO/0004)

'til the next time... Happy Crafting!

Fee x


Wednesday, 2 January 2013

Happy New Year

Hi Everyone

I can't believe Christmas has come and gone and that it's time to start putting away all the lights and decorations (where did the year go?)! Anyway, I hope everyone had a wonderfully festive time and I want to wish you all a very Happy Crafting New Year!


I've had a very busy time recently with family get togethers and crafty plans for 2013. The new website is almost ready to go live, so watch out for that. 

Also, I will be appearing on Ideal World's Create and Craft tv again at 4pm on Friday 18th January. If you fancy finding out about Efco's fabulous Efcolor low melt enamelling system and want to pick up some great deals on their tealight stove and starter powder set then set your alarm so you don't miss out! (I'm hoping I've solved the over zealous air conditioning problem I had last time so that you will actually be able to see the tealight stove in action this time.)

The next product of the month will be all things felting - wet felting, crocheted wool felting and maybe even a touch of needle felting thrown in for good measure - which will be available at the beginning of February.

As always... Happy Crafting!

Fee x