Soapstone is still off the menu (hence why no post last week) as the new boiler has only just made it onto the wall today. :S The men arrived 8 days late and it is now day 4 of a 3 day job with day 5 still to come...woo hoo! At least with any luck we may have heating by the end of the tomorrow, which considering the weather has taken a turn to the cooler side is just as well.
Anyhoo, as I still can't get to my craft desk to photograph my soapstone jewellery, I decided to do a little surfing today to find some free polymer clay tutorials and websites that might be of interest to you.
So here goes...
No 1 - Polymer Clay Central - A heart cane with photographic step-by-steps by Candice Mathewson.
No 2 - Artybecca - A resist technique from Becca of Pittsburgh, Pennsylvania
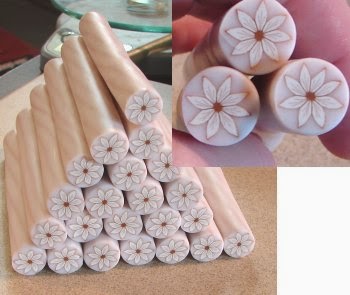
No 3 - Bead Goodies - A great tutorial for making consistently good canes from Candice Mathewson.
No 4 - Starless Clay - Rainbow Daisy Pen Tutorial from Amber Elledge.
No 5 - Livemaster.ru - A Russian site but it has a fabulous autumn leaf tutorial with step-by-step photos which you should be able to understand without too much help from Google translate.
No 6 - Naera on Deviant Art - There are some great pictorial step-by-step instructions for assorted little characters which could be used for either sugar craft or polymer clay decorations.
No 7 - Artsy Clay: creations & inspirations - A tutorial for how to combine Alcohol Inks with polymer clay.
No 8 - Manualidades para niños - If you like Minions you'll love this pictorial instruction for creating your own little minion :)
No 9 - Le Blog de Bounette - You'll find loads of inspiration on this French blog by Françoise Hecquet including some pictorial tutorials for how she creates some of her polymer clay items. (She even has a book out!)
No 10 - Beadazzle Me - Wonderful instructions for How to Make a Polymer Clay Mold for polymer jewelry using grasses by artist Sherri Kelberg.
No 11 - L'Atelier de Jancydol (The Jancydol Workshop) - The French blog of Genevieve Dolosor has loads of inspiration for aspiring polymer clay artists.
No 12 - ST-Art-Clay - You'll find some stunning inspiration and great colour combinations on this flickr site.
Don't forget that there is always Pinterest too... just type 'polymer clay' in the search box and you'll find loads of wonderful photos with links to all manner of amazing polymer clay sites such as Polymer Clay Daily.
Happy modelling to all those polymer clay artists out there! :)
New boiler trumps blog post this week!
Well, I had a soapstone jewellery blog post planned for this week but unfortunately our boiler has packed up and needs to be replaced. So.... instead of being able to take photos of the samples I wanted to share with you I am having to try and condense all my craft stash (and yes, I have a mountain to shift) so that our plumber can get to all the radiators! :(
So, I'm afraid I've had to postpone my planned post until next Friday...but here's a taster of what will be coming next week...
In the mean time, if you're planning on making jewellery for Christmas presents for family or friends this year, you might be interested in Pantone's report on fashion colour trends for Autumn/Winter 2014 and Spring 2015. That way you can make sure that your jewellery will co-ordinate with any new outfits in their wardrobe. :)
Pantone Colour Trends for Fall 2014
Leatrice Eiseman, executive director of the Pantone Color Institute®, says that 'this is a season of untypical colours - more reflective of the imagination and ingenuity, which makes an artful collection of colours and combinations not bound by the usual hues for fall. There is a femine mystique that is reflected throughout the palette, inspired by the increasing need for women everywhere to create an individual imprint.' This should make it ideal for creatives making unique pieces of jewellery as presents!
Pantone Colour Trends for Spring 2015
This season, cooler and softer colour choices with subtle warm tones follow a minimalistic en plein air theme, taking a cue from nature. There is an emphasis on the cooler and softer side of the colour spectrum, with bold colour taking a more supportive role as an accent.
'An eclectic, ethereal mix of understated brights, pale pastels and nature-like neutrals take centre stage as designers draw from daydreams of simpler times. Remembrances of retro delights, folkloric and floral art, and the magical worlds of tropical landscapes restore a sense of wellbeing.'
Happy crafting everyone! :)
Last month I posted a new project... HF/0021- Take a Note, a homemade peg noticeboard using a canvas panel as a base and decorating ordinary cheap clothes pegs with napkins and pyrography to use to attach notes to ribbon wrapped around the panel.
Having made this 30x30cm panel I decided that I'd like a bigger one to use myself as an inspiration board. I also decided that I wanted a more striking background for my new larger 40x40cm inspiration panel and, as such, thought I'd share with you how I created this new version.
I used the same materials as in the above project except I didn't worry with attaching any wooden letters and you don't need any white paint. The only additional materials you'd need would be silver calligraphy powder and some clingfilm.
First water down the paints - the more you water them down the paler your background will be, but they must be very wet for this technique to work.
Protect your work area before thoroughly wetting your canvas with the colours. The canvas needs to be flooded with paint.
Randomly sprinkle silver calligraphy powder over the wet paint. (This will turn to ink as it hits the wet paint.)
Take 2 pieces of clingfilm wider than the canvas and overlap them so that they create one piece larger than the canvas. Lay it over the top and scrunch it up, creating wrinkles and pockets of trapped air bubbles. Leave to dry naturally.
When dry, peel back the clingfilm. Spray with matt varnish to seal and protect the paint and calligraphy ink.
Use a pencil to write some inspirational words on some ordinary wooden pegs. Trace over the pencil with a pyrography tool to make the words permanent.
Apply a little matt Mod Podge to some of the pegs and lay the top layer of napkins over the top, gently patting them down. Carefully apply another coat of Mod Podge over the top.
When dry, trim the excess napkin before applying a few more layers of Mod Podge, allowing to dry between layers.
To finish, wrap some ric rac or ribbon around the canvas, tying it at the back and fixing it in position with tape (again on the back). Use the decorated pegs to attach your inspirational photos etc.
So, as you can see you can take a Projects4Crafters project sheet and put your own spin on it as it were or combine different techniques on the same project. Enjoy!