Friday, 8 February 2013

Valentine's Day

Hi Everyone,

Valentine's Day is just around the corner so here's a few Valentine themed project ideas for you...

This is an Efco plywood heart shaped box.
A stencil was used as inspiration for the pattern. It was traced onto the lid with a pencil and then a pyrography tool used to burn it into the wood. A touch of red paint was picked up on a baby wipe and lightly applied over the top, intensifying at the edges and in the hearts. A hint of gold was applied to the leaves and extreme edge. Several strands of gold thread were knotted through the 3 heart shaped wooden buttons befor they were stuck on.


The sides were coloured with a baby wipe and red paint (intense at the top, fading to the bottom). Gold paint was applied on top of the red to the side of the lid and a 5mm strip of red velvet paper stuck in the middle. Red velvet hearts were punched using a Grand Calibur and Spellbinders Scallop Heart Die. 2 small cuts were made in each one to allow a gold ribbon to be threaded through before being stuck to the side of the box.

You can easily create personalised mugs using Efco's Color Dekor 180ºC
Just punch out or cut your desired shapes, place them in water for a few moments to allow you to slide them off their backing sheet, position them on your mug, squeezing out the excess water and leave to dry for 24 hours. Then bake them in an oven at 180ºC for 30 mins to make them hand washable. The Color Dekor comes in a variety of colours as well as Chinese Calligraphy and Black or Gold letters.

Don't forget you can decorate the bottom of the mug as well - an ideal place for a surprise or fun message!

If you are planning on giving a small Valentine's gift this year then why not make your own packaging like these delightful little bags:


Mini Valentine Bags are easy to make if you have a Spellbinders Heart Die Set and Grand Calibur machine. Just cut and emboss 2 large hearts from card and decorate them as desired. Cut a strip of card 4 x 15cm. Score and fold this in half (ie 7.5cm) and 1cm in from the edge on both long sides (see photo). Cut a small triangle from either side at the centre to enable you to fold it slightly more than 90º. Use double-sided tape on the flaps to stick the strip between the two hearts and attach the ribbon handle.

If you can't find the perfect Valentine's card or just enjoy making your own unique handmade cards then here are a few quick ideas (all of which use the Spellbinders Dies)...


Run a piece of white card through the Grand Calibur in an embossing envelope and cut to size for your card. Run your card through with an Edgeabilities Die on the right front edge. (Make sure to open your card up first so you only cut the front of the card.) Take a piece of pink card and run that through with the same Edgeabilities Die and line it up with the front cut edge of the card before sticking it to the inside edge of the card. Use pale pink chalk to pick out a feature of the embossed card and attach a small piece of ribbon with a small pink brad. Stick the embossed card to the front and trim the edges. Stick a narrow ribbon down the left edge to finish.
You can use the heart dies to create small popups in your card. Punch several hearts from pink paper and fold them in half. Stick the halves back to back before sticking them in the middle of your card.
You don't have to go for a traditional folded card. You can create a pocket card by cutting out two hearts and sticking the edges together with narrow double-sided tape. Decorate the front as desired and punch out a smaller heart to write your message on before popping it inside.
You can use the Spellbinders Edgeabilities Inserts Dies to create patterns across cut out shapes as well as using them in conjunction with their border dies. Here Classic Decorative Inserts One has been laid across in two different directions and punched. A ribbon was then threaded through the holes and the ends wrapped around the stuck to the back before the heart was fixed to the card.
A very simple but effective card can be created by punching out a heart and then embossing it in an embossing folder. Punch small holes down either side and thread a narrow organza ribbon through. Tie 3 small bows and stick them over the top holes and the bottom point of the heart. Stick the heart to your card.


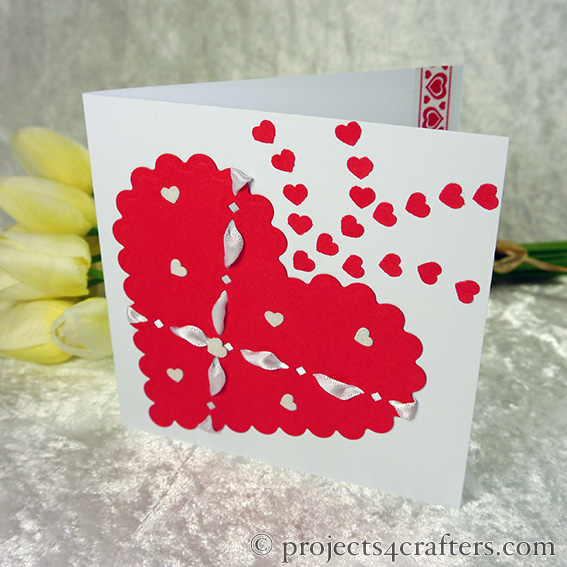
You don't just have to cut and emboss flat shapes with the Spellbinder's Nestabilities Dies either. The project below shows how, with a little simple paper folding before using the scalloped heart die, you can create a card with a difference. Perfect for that special Valentine's message! Check it out at: http://www.projects4crafters.com/Special-Occasions-Cards(2296643).htm

Be My Valentine(CO/0004)

'til the next time... Happy Crafting!

Fee x


Wednesday, 2 January 2013

Happy New Year

Hi Everyone

I can't believe Christmas has come and gone and that it's time to start putting away all the lights and decorations (where did the year go?)! Anyway, I hope everyone had a wonderfully festive time and I want to wish you all a very Happy Crafting New Year!


I've had a very busy time recently with family get togethers and crafty plans for 2013. The new website is almost ready to go live, so watch out for that. 

Also, I will be appearing on Ideal World's Create and Craft tv again at 4pm on Friday 18th January. If you fancy finding out about Efco's fabulous Efcolor low melt enamelling system and want to pick up some great deals on their tealight stove and starter powder set then set your alarm so you don't miss out! (I'm hoping I've solved the over zealous air conditioning problem I had last time so that you will actually be able to see the tealight stove in action this time.)

The next product of the month will be all things felting - wet felting, crocheted wool felting and maybe even a touch of needle felting thrown in for good measure - which will be available at the beginning of February.

As always... Happy Crafting!

Fee x

Wednesday, 19 December 2012

On, Comet! Card

Hi Everyone

Here's a quick little card project for anyone who needs to send a Christmas card to someone they know is going through a bit of a tough time. Sometimes you just need a 'not too jolly' Christmas theme and preferably blank inside for you to write whatever you want (no point saying Happy Christmas when you know that it won't be)...

On, Comet!
 

Materials Needed:
Efcolor Tealight Stove
Aluminium Circle Blank
Fine Sandpaper
Texture Blue and Silver Efcolor Powders
Large Reindeer Punch
Square Card & Card Offcut
Light Blue Paper
Grand Calibur Die Cutter & Venetian Motifs Die
Fine Silver Tinsel
Dekofix Glue, Double-sided Tape & Scissors


Use the reindeer punch to create a stencil from a card offcut.
Lightly sand the aluminium blank.


Cover the blank with a good layer of Texture Blue Efcolor Powder.


Place the powdered blank on the tealight stove and leave until the powder has melted. Remove from the heat and leave to cool.


Place your stencil over the top of the enamelled blank and cover it with just enough Texture Silver Efcolor Powder to block out the blue.


Carefully lift and slide the stencil over to one side. Place the blank back on the stove to melt the powder and then leave it to cool.


Take a square card and stick a light blue diecut Venetian motif in the centre. (You can use four of the diamond pieces you remove from the points to decorate the corners of your card.) Use double-sided tape to stick the enamelled blank in the centre.


Add touches of Dekofix glue around the edges of the blank.


Stick a piece of fine tinsel to the Dekofix around the edge of the enamelled disc to finish!

Efco's aluminium blanks for their Efcolor low melt enamelling powders are perfect for card makers as they are light and so don't make cards topple over in the same way that copper blanks do. Add a touch of Spellbinders magic to finish and you end up with a very simple but classy card!

For a downloadable version of this project go to the Christmas Card page on Projects4Crafters.com

Happy Crafting!

Fee x

Tuesday, 18 December 2012

Product of the Month - Efco's Kumihimo Range

Hi Everyone

Kumihimo is the ancient art of Japanese cord braiding and is currently rather popular with jewellery makers. You can use a variety of threads or cords to create the braids and can even combine beads with it to make stunning jewellery and accessories. 

Long ago, the Japanese used Kumihimo braids in everyday life, even the Samurai would use them to lace their armour. Traditionally performed on a wooden braiding stool called a Marudai, artisans would have to know their patterns by heart. Nowadays it is much easier with Efco's Mobidai® and pattern discs. The Mobidai® are made from dense foam which have slots around the edge into which the individual strands can be firmly tucked, meaning that you can pop it in your bag and take it anywhere, to work on as and when you have a moment. Efco also do a range of satin weavecord, cotton waxed cord and alacantra cord (all of which can be used to make Kumihimo braids) as well as a wonderful selection of jewellery findings to give your braids a professional finish.

Here are the latest projects to give you an idea of what you can easily achieve with Efco's Kumihimo range:


(These projects are just the tip of the iceberg as far as what can be achieved with Efco's Kumihimo range.)

If you're looking for a last minute Christmas present for a crafty friend or are in need of a stocking filler then why not consider Efco's Kumihimo Craft Set. It's an ideal set to get you started with Japanese braiding as it has everything you need to create several braids using two different pattern discs - just perfect for nights in, in front of a roaring fire!


Check out the Product of the Month page to find out more about Efco's Kumihimo range of products.

Happy Crafting!

Fee x

Saturday, 8 December 2012

Efco Storage Jars

Hi Everyone

Efco do a range of Storage Jars which are ideal for personalizing! You can create decorative storage for around the home or turn them into attractive, multipurpose packaging for Christmas presents! There are two new project sheets on the glass painting page of Projects4Crafters which use Efco's fab Color Dekor 180.


DP/0020 - Striped Jar


DP/0021 - Floral Jar

Color Dekor is a fabulous product as it makes decorating round objects a breeze. It is paint in sheet form which can be cut or punched. Once baked at 180ºC for 30 minutes it is hand washable. Your finished items will be smooth and run-free!

If you're into home baking and want to give your creations away as presents then the larger storage jars are ideal for packaging your wares...


If you're giving sweeties at Christmastime then you can make them extra special by 'wrapping' them in a unique storage jar. The fir tree felt border was stuck on the jar below with a hot glue gun and then it was finished off with a bow. The Color Dekor range also has black and gold letters so why not personalize the jar first with the child's name on the lid!


If you're looking for a new way to wrap up a selection of toiletries this Christmas then why not try one of Efco's largest storage jars...


This one has diecut straw paper fir trees stuck on, with Efco's Snow Liner adding a touch of snow to the tree tops. It has then been finished off with a ribbon!

'Cookie in a Jar' pressies seem to be very popular this year, so why not make your own by decorating one of Efco's large or medium sized Storage Jars! Here, the word 'COOKIES' and a holly motif have been punched from their Color Dekor 180 sheets and stuck on. Once baked in the oven for 30 minutes at 180ºC it is then hand washable. Leave it to cool before adding your Cookie Mix ingredients. 


There are a range of cookie in a jar recipes available for free at AllRecipes.com

If you want to use a medium sized jar like the one above rather than a large one you may need to halve the ingredients. I chose the 'Cookie-in-a-Jar I' recipe which would normally make 4 dozen cookies but I halved the ingredients to fit the jar. Don't forget to write out the instructions for making the cookies and attach this to the jar. (If you've halved the ingredients you will have to remember to halve the remaining ingredients on the instructions too ie butter and eggs.) By decorating and personalizing the jar you make that part of the present, a very important part too as the cookies will soon be eaten but the jar will still be there!

There are so many different ways you can decorate storage jars but Efco's Color Dekor is definitely a quick and easy way when you're pressed for time!

Happy Crafting!

Fee x

Sunday, 2 December 2012

Quilled Christmas Decoration

Hi Everyone

If you're getting into the festive mood then why not create your own Christmas decorations. There are various project sheets available on the website. Check out: http://projects4crafters.com/Special-Occasions(2296752).htm  

However, if you enjoy papercraft techniques then why not try this Quilled Decoration which I've just uploaded to the Papercrafts section...

P/0003 - Quilled Decoration


Materials needed:
Christmas Quilling Set
Dekofix Glue
Transparent Thread
Topaz Acrylic Gems 4mm
Extra Pins
Scissors


Step 1.  Cut 7 4mm strips of quilling paper into quarters (gold has been used here). (A) Take 4 pieces and create scrolls by curling first one end into a round and then curling the other end in the opposite direction. Make one end slightly larger than the other. The more uniform the shapes are the more symmetrical the finished decoration will be. (Smear a little glue over the ends to help them hold their shape.) (B) Take 4 pieces and curl one end into a round, leaving a 15mm tail. Use your finger nail to gently curl this slightly in the opposite direction. (C) Take 4 pieces and curl one end into a round, this time leaving a 20mm tail. Again curl this in the opposite direction, making the end a slightly tighter curl. (D) Roll 8 pieces into 10mm rounds, gluing the ends of the strips to fix them. Pinch them to create drops. (E) Roll the last 8 pieces into 10mm rounds, gluing the ends of the strips to fix them.


Step 2. Take the 4 scrolls (A) and stick them smaller ends together to create a cross shape.


Step 3.  Take the longer tailed rounds (C) and fix them to the arms of the cross shape by wrapping and gluing the ends around the ends of the scrolls. Fix the shorter tailed rounds (B) to the back of the (C) sections by gluing the ends of the tails to the back of the scrolls and the rounds back to back with the rounds of the longer tailed sections.


Step 4.  Add 2 drops (D) with a round (E) in between the drop points in between each arm of the decoration.


Step 5.  Add the last rounds (E) to the end of each arm. Stick them into the curls of the (C) sections.


Step 6.  Use more Dekofix glue to stick some acrylic gems on. Stick one in the centre of the decoration, one at the beginning of each arm and one towards the end of each arm.


Step 7.  When dry, turn the decoration over and stick gems on the other side. Finish by feeding a length of transparent thread through the top of one arm to create a hanger.


For a downloadable version of this project go to: http://projects4crafters.com/Papercrafts(2296746).htm

Of course, if you like a lot of bling for Christmas, before sticking the gems on in Step 6 you could spray the decoration with spray adhesive and dip it in ultrafine glitter.

You don't have to make your decoration gold either, as you can choose paper and gem colours to tie in with your Christmas theme. 

Happy papercrafting!

Fee x

Saturday, 1 December 2012

Efcolor Leaf Windchimes

Hi Everyone

Here's a rather topical project, what with all the leaves turning beautiful colours and falling from the trees. They are easy to create using Efco's Efcolor enamel powders...

EN/0034 - Leaf Windchimes


Materials needed:
Leaf Copper blanks
Efcolor Powders
Efcolor Tealight Stove
Deco Wood
Transparent Thread
Gold Flat Beads
Dekofix Glue
Fine Sandpaper
Pliers & Scissors 


Step 1.  Lightly sand the leaf copper blanks on both sides and wipe them on a clean cloth to remove any grease or grit.


Step 2.  Cover each blank in a good layer of powder, adding touches of other colours as desired. Place them on the tealight stove until the powder has melted. Then remove them & leave to cool.


Step 3.  Turn the blanks over, and repeat Step 2 for the other side, this time placing each blank on the stand to both heat and cool.


Step 4.  Join 2-3 leaves together with transparent thread. Tie knots in the thread and secure with a touch of Dekofix glue. For a stronger finish you can use flat beads squashed with pliers to secure the thread.


Step 5.  Lay the threaded leaf sections out roughly how you would like them to hang in relation to each other. Fix more transparent thread to the top leaves, leaving a long length to attach them to the wood pieces.


Step 6.  Attach the tops of the threads to pieces of wood, using glue to fix them in position. Keep checking how they hang and make adjustments as necessary by sliding the threads along the wood pieces to balance them.


Step 7.  For extra strength use two strands of thread to attach the wood pieces together and to create a hanger for the top piece of wood.

If you'd like a downloadable version of the project go to http://www.projects4crafters.com/Enamelling(2296749).htm

Happy Crafting to one and all

Fee x