Happy New Year!
My new year has started well with a De Witte Engel soft toy show on Hochanda TV with Leonie...
The dolls we had on the show proved very popular too, including this little heart doll...
Made with 100% pure woollen stuffing and beautifully soft flannel this little doll comes in three colourways and is so easy to make. There are instructions in the kit (drawings and written) for how to make the doll and it also tells how, if I mother keeps the doll near her skin (eg overnight), the doll will take on her odour making it even more of a comforter for her baby. The finished doll can be machine washed at 30º on a wool wash or hand washed and then left to dry face up to avoid any watermarks appearing on the face.
You can embroider the doll how you wish eg with a baby's name or hearts etc, but if you'd like to embroider flowers you could do them like this...
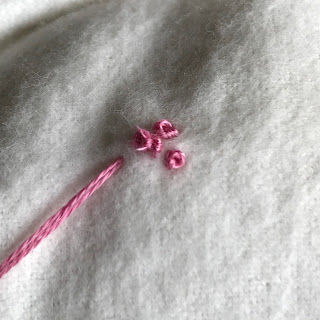
5. Wrap the thread three times around the needle one last time and again take the needle back down right beside where you came up. This time bring the needle up at the base of where you want your first petal eg. a few millimetres from the first knot.
6. Trim the ends of any threads sticking up in the first knot, leaving you with three neat French Knots.
7. Decide on the length you want your petal to be. Take the needle down beside where you came up and up where you want the tip of your petal to be.
8. Pull the thread, leaving a loose loop. Take the needle back down beside where you came up, making sure that you have trapped the top of the loop by passing the thread over the top of it. Bring the needle out at the base of the second petal beside another French Knot.
9. Repeat Step 7 to create the next petal.
10. Repeat Step 8 bringing the needle out beside the last French Knot.
11. Repeat Steps 7 and 8 to create a third petal, this time bringing the needle up on the opposite site of the French Knots halfway between the other two petals.
12. Create another petal and bring the needle up between two other petals.
13. Create another two petals so that you end up with a total of six petals (three petals in between the first three).
14. When finishing the last petal bring the needle up close to where your thread comes out, to lock the petal in place.
15. Pass the needle through the loop created by the thread before pulling the thread tight to secure it.
16. Take the needle down through the doll and out through the back, cutting the excess so the end is hidden inside the doll.
I embroidered three flowers on this little heart doll but you can repeat the steps as many times as you like to create as many flowers as you want.
nb. If embroidering more than one flower you can 'daisy-chain' them by bringing the thread up in the centre of the second flower when locking the last petal of the first flower in place instead of tying off the thread and trimming the excess.
I think this little doll kit would make a fabulous present for a expectant mum or new baby or how about giving a kit to both 'soon-to-be' Grannies with the request that they return the finished dolls on the due date as a way of announcing the happy event. One thing I would highly recommend is that if you do decide to make one that you go for two instead as, speaking from bitter experience, if the little one gets attached to the doll and won't sleep without it it can be a nightmare so it's wise to have a backup in case the first doll gets lost or needs to be washed!
Happy sewing! :)


No comments:
Post a Comment