If you fancy giving someone a little gift this Easter other than chocolate though, why not try your hand at creating this personalised Post-it Note Book using a couple of Stampbord coasters as covers...
You'll be amazed at how quick and easy it is to produce really polished results!
Materials needed:
2 Stampbord Coasters (Premium Art Brands)
Old Versamark Ink Pad (Efco)
Ocean Pan Pastels Set (Premium Art Brands)
Sofft Foam Applicator (Premium Art Brands)
Rose Rubber Stamp Set (Premium Art Brands)
Alphabet Rubber Stamp Set (Efco)
Acrylic Stamp Block
Memento Black Ink Pad
Stampbord Scraper Tools (Premium Art Brands)
Graph'It Apricot Alcohol Pen (Premium Art Brands)
Graph'It Blender Alcohol Pen (Premium Art Brands)
Gold Graph'It Shake Pen (Premium Art Brands)
Baby Wipe
Matt Spray Varnish
Co-ordinating Coloured Card
Embossing Tool, Craft Knife, Ruler & Cutting Mat
Double-sided Tape
Square Post-it Note Pad (76x76mm)
Step 3. Apply the some turquoise PanPastel across the top edge, blending it into the bright yellow green in the middle. Then apply some phthalo green PanPastel across the bottom edge, again blending it into the middle.
Step 4. Ink up the funky flower stamp with black Memento ink and stamp it in the middle, along the phthalo green edge.
Step 5. Re-ink the stamp and stamp it at a slightly different angle off one side of the Stampbord to fill in the gap. Repeat for the other side to fill the entire bottom edge of the Stampbord with stamped flowers.
Step 6. Spell out your chosen name using the alphabet stamps on the acrylic block. (Remember to spell it backwards when the stamps are face up so that when you flip the block over it will be the correct way.) Ink up using the Memento ink pad and stamp it across the top of the Stampbord.
Step 7. Use the scraper tools to scratch away the PanPastels inside some of the stamped flowers.
Step 8. Colour the white flowers using the Apricot Graph'It pen. Use the Blender pen to create highlights giving them a more dimensional feel.
Step 9. Use a scraper tool to scratch a rough border around the stamped name.
Step 10. Repeat Steps 1-3 for the back panel. Stamp a couple of faux hinges at the top edge using the Fleur De Lis Stamp from the Roses Stamp set. Spray both covers with a good coat of Matt Varnish.
Step 12. Colour the edges with the Gold Graph'It Shake pen.
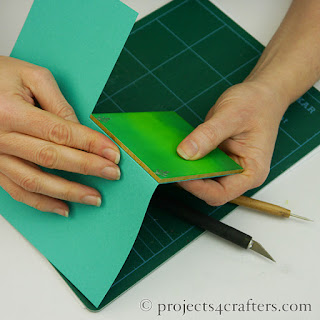
Step 13. Stick the back panel to a piece of scrapbook card (see photo) using double-sided tape. Crease the card along the top edge of the Stampbord with an embossing tool.
Step 14. Measure the depth of your Post-it Note pad (the standard size is usually 1cm) and score the card this distance from the first score line.
Step 15. Stick the front cover, in line with the back cover, along the second score line.
Step 16. Trim the excess card with a sharp craft knife before sticking your Post-it Note pad inside.
You could scrape away more PanPastels to colour in more flowers or alternatively use a different stamp, perhaps one that you think would suit the recipient's interests or hobbies or just stamp/write a message on the front instead. Quite frankly the possibilities are endless when it comes to personalising a Stampbord Post-It Note Book!
Happy Crafting!


No comments:
Post a Comment