Playing with Stampbord
I've done 2 days of Stampbord Shows on Hochanda TV now which have been fun if a little last minute! I remember buying Stampbord years ago, having a play with it and then tucking it away until I had some really special project to do as I didn't want to waste such a precious resource. I'm so pleased that now, 7 years later, Stampbord has made it back to these shores and at almost half the price it used to be!
I've not had a lot of time to renew my acquaintance with Stampbord yet but what little time I have had has reminded me what a fabulous product it is. Developed by Ampersand Art Supply this incredible art and craft surface allows clean, perfect rubber stamp impressions every time and is correctable and erasable. It has so many uses including jewellery, customising boxes, magnets, altered art, ornaments, card toppers, embellishments and even scrapbooking as it is acid free. The ultra-smooth clay finish accepts all types of inks and no matter how wet you get it it will never warp or buckle. The clay surface also allows you to scratch back into your designs to create highlights and texture which is something you can't do on ordinary cardstock.
So here's the first new project using Stampbord...
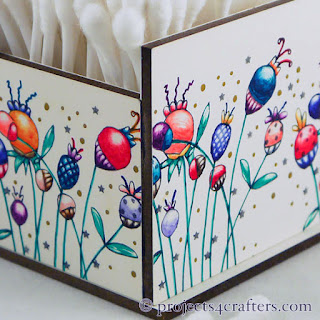
Stampbord Pot
Materials needed:
3 x ATC Stampbord
2 x 2" Stampbord Squares
Memento Black Inkpad
Flower Stamp
Acrylic Block
Graph'It Alcohol Pens
Stampbord Scraper Tools
Gold Graph'It Shake Pen
Silver Glitter Graph'It Shake Pen
White 12 x 12 Scrapbook Card
Acid free glue & Super Glue
Fine Embossing Tool
Craft Knife, Ruler & Cutting Mat
Step 1. Ink up the stamp with black Memento ink and stamp it on a square piece of Stampboard. Not all the image will fit on the board so allow the bottom and sides of the stamp to go off the edges.
Step 2. Colour in the stamped image using the Graph'It alcohol ink pens. Use the blender pen to create soft highlights & blend colours.
Step 3. Use the scraper tools to scratch some of the inks away creating brighter highlights on the flowers and leaves.
Step 4. Colour the dots of the stamped image with the gold Shake Graph'It pen.
Step 5. Add dots of silver glitter to the centres of the stars.
Top Tip: If your stamp smudges or your ink bleeds over a line when colouring you can always scratch away imperfections with the scraper tools.
Step 6. Repeat Steps 1-5 for another square piece of Stampbord and two ATC pieces. nb. You will have to stamp the image twice on the larger pieces of Stampbord.
At this point you can take the easy option of covering all the Stampbord elements with separate pieces of card or alternatively you could paint them with acrylic paint before you glue them together using Super Glue.
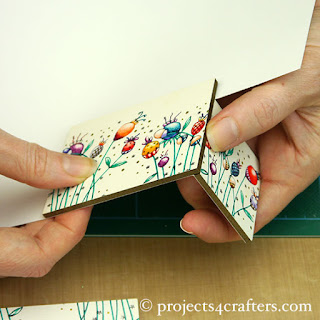
Alternatively, you can use one piece of card to join all the sides together before sticking them to the base...
Step 7. Stick a Stampbord square in the corner of the card, making sure that the base of the stamped image is at the edge of the card. Cut the card along the top of the Stampbord piece & score down the side. Fold the card along the score line & stick an ATC Stampbord piece aligned with the front edge of the square.
Step 8. Move the pieces to the edge of your table so you can lay the ATC flat on your cutting mat. Lay another square beside the ATC and cut around the exposed areas of card around the ATC piece.
Step 9. Lay the ATC face down and, using a square piece as a guide, cut along the top edge and score the card down the inside edge.
Step 10. Fold the card along the scoreline. Stick the square Stampbord along the scoreline level with the end of the ATC piece.
Step 11. Again wrap the pieces around the edge of the table so that you can cut along the top of the square piece and score down the side. Stick the last ATC piece in position using a ruler to help line it up along the bottom edge. Cut around it to remove the excess card.
Step 12. Lay the last ATC piece face down and position the first square level with the end. Cut the card on the back of the ATC piece around the top and inside edge of the square.
Step 13. Carefully remove the excess strip of card on the back of the ATC piece.
Step 14. Use Super Glue to stick the edges of the Stampbord together.
Step 15. Use more Super Glue to stick the sides of the pot to the ATC base.
There's lots more inspiration for working with Stampbord available all over the worldwide web including YouTube and Pinterest. Here are a few links to get you started...
The Stampbord website has inspiration and how-to features:
http://www.stampbord.com/idea-gallery.html
The official Facebook page for Stampbord:
https://www.facebook.com/stampbordfans/info/
The Projects4Crafters Stampbord Pinterest board:
https://www.pinterest.com/projects4craft/stampbord/
Stampscapes Stampbord YouTube Videos:
https://www.youtube.com/results?search_query=stampscapes+stampbord


Fabulous tutorial Fiona, thank you. BUT you didn't give us the name of the stamp. I fell in love with it when I saw it but can't track it down without a name please???
ReplyDeleteLin
Hi Lin, Sorry all the materials used for this project (including the stamp) were available for purchase on the Hochanda TV show so that's why I didn't think to leave more info but I should have given you more details of the stamp I used. It's from a set of stamps from Premium Craft Brands called Roses A5 Stamp designed by Nikky Hall. You may still be able to get it from Hochanda.com but if not you can get it online from Your Creativity Store: http://www.yourcreativitystore.com/products.php?product=Roses-A5-Stamp. I hope this helps but if you need any more info don't hesitate to contact me! Fee x
Deleteps. Thank you for your kind comment and I'm glad you like the tutorial! ☺️
DeleteFantastic project Fiona! I have just received my stamp bored after seeing you on HOCHANDA and am going to have a play later! Thank you 😄
ReplyDeleteThank you Jane, I'm glad you like it! I'm so pleased your Stampbord has arrived and hope you enjoy playing with it...there's so much you can do with it, I'm sure you will!
DeleteI'll be posting more Stampbord projects over the coming weeks in case you find yourself in need of a little more inspiration. 😉