Hi Everyone
Hope you all had a Happy Easter and haven't made yourselves too sick on all the yummy chocolate!
Eleonora posed a very good question via the contact form and I thought I'd share it with everyone:
"I would like to know what is the main difference between Efcolor and the high temperature firing enamels, apart from the temperature that is. I guess my main concern is the quality of the final product because if they were exactly the same nobody would bother with a kiln."
Efcolor powders are resin based whereas traditional enamelling uses glass powders, hence the need for a kiln and high temperature firing. As such, Efcolor enamelled objects will not be quite as hard wearing as glass enamelled ones. I ahve some traditionally enamelled pieces I created over 20 years ago that are still fine although, that said, they can still 'chip' and loose embedded items (one of mine has).
I have found that Efcolor powders work perfectly well for jewellery and embellishments etc. If you have something that is likely to get a lot of hard wear you will find that some Efcolor powders are stronger than others. For examples, I ahve a phone charm (Project: EN/0005) that has seen a lot of daily wear over the last six months or so. The copper glitter heart is still as perfect as the day I made it but the red transparent heart is showing some wear at the edges as well as a couple of fine cracks on close inspection. Whether traditional or Efcolor powders are used enamel, when cool, is brittle by nature and so needs a strong backing to protect it. Copper metal blanks are perfect for this purpose as they also conduct heat well.
The Efcolo range makes it possible for many more people, including youngsters, to try their hand at enamelling without having to make a huge financial investment. With the tealight oven it also means you can do it anywhere. However, I would recommend that anyone who wants to get seriously involved in enamelling, especially in combination with silver-smithing or precious metal clay, consider investing in the traditional glass enamel powders and a kiln. Efco also do a small range of kilns as well as the glass powders, tools etc. so contact your local Efco stockist if you are interested as they should be able to order them for you.
If you're not sure what system to invest in then it's worth starting with the Efcolor powders to see how you get on. This way you won't have a huge financial outlay at the start. The principles of enamelling are the same whether you are using Efcolor powders or traditional enamel powders. The only difference when working with them is that the glass powders need firing at the higher temperature and the glass chips and rods melt properly when embedded in the powders. When using glass chips and rods with Efcolor powders they don't melt but get 'locked' into the enamel in the same way that the metal jewellery does. The other benefit of using the low melt Efcolor powders is that you can combine them with other elements such as Tim Holtz Alcohol Inks, Swarovski gems, chipboard, fabrics and fibres, all of which will not be damaged by heating at 150ªC. You don't even need to invest in the tealight oven as an ordinary domestic oven will do when using Efcolor powders although I definitely think it's worth its less than £20 price tag if you want to give enamelling a real go. If you then find that you are getting more serious about enamelling, you can invest in the traditional powders and kiln etc. knowing you will not be wasting money.
I hope this helps anyone who is still unsure of the difference between Efcolor enamelling and traditional enamelling. If you have any questions don't hesitate to drop me a line.
Happy Crafting one and all!
Fee x
Tuesday, 3 May 2011

Wednesday, 23 March 2011
Fimo Fun!
Hi Everyone
Hope you are all well and enjoying the sunshine we've been experiencing in the UK during the last week. I had a great day at Flutterby Crafts teaching a lovely bunch of ladies how to make a Fimo bullseye cane and decorate beads as well as another session on the fabulous Efcolor enamelling. If you're interested in Fimo jewellery then I've recently uploaded a few projects and technique guides to get you started... and there'll be more to come soon!
One very good question that I've received via the 'contact us' page came from Debbie who asked if it was possible to use a stone polisher for polishing Fimo beads. As there may be more of you out there who are wondering the same thing I thought it worth mentioning here in the blog. And the answer is yes, you can use a stone polishing tumbler to polish and buff up your Fimo beads! Instead of using grit as you would to polish stones you need to use either wet and dry sandpaper or small, rounded, smooth but not polished, river rocks. If purchasing from a garden centre or builder's merchant here in the UK you need to be looking for pebbles or gravel from which you can pick out smooth pebbles that are no larger than 10mm and that are not jagged or cracked. If using wet and dry sandpaper either line your tumbler with it or cut it up into small pieces and don't forget to put some water in. If you want to buff your beads further then cut up small pieces of white denim or acrylic fleece and tumble that with your beads - this time without any water. If using a rubber barrel (not plastic) you may need to line it with a double thickness of denim to prevent discolouration of your beads.
I have always hand sanded my Fimo with wet and dry sandpaper as I don't own a stone tumbler and it is accepted as the best way to achieve the finest finish. (Always use it wet as that way the fine polymer clay dust is trapped in the water and you don't breath it in.) However, it does take quite a lot of time to achieve a superb shine - I tend to do it whilst watching tv as not only is it is time consuming but also thoroughly boring! I generally tend to start with a 360 micron and end with an 800 micron. For extra gloss you can then coat it with a layer of Staedtler's Gloss Lacquer - if sanded smooth before application I find you can't tell that it is coated in lacquer, all you see is an extra sheen. Also if you are happy using the lacquer you don't need to be quite so fussy with the sanding.
However, if you don't want to waste any time on sanding and polishing then a stone tumbler is the way to go - just leave it working for a few hours and let it do the work for you. Do bear in mind that it can be anything up to 6 hours for the first stage after which you will need to remove the rougher stones leaving only the really smooth ones for another 4-5 hours to achieve a truly polished look.
Happy Crafting everyone!
Fee x
Hope you are all well and enjoying the sunshine we've been experiencing in the UK during the last week. I had a great day at Flutterby Crafts teaching a lovely bunch of ladies how to make a Fimo bullseye cane and decorate beads as well as another session on the fabulous Efcolor enamelling. If you're interested in Fimo jewellery then I've recently uploaded a few projects and technique guides to get you started... and there'll be more to come soon!
One very good question that I've received via the 'contact us' page came from Debbie who asked if it was possible to use a stone polisher for polishing Fimo beads. As there may be more of you out there who are wondering the same thing I thought it worth mentioning here in the blog. And the answer is yes, you can use a stone polishing tumbler to polish and buff up your Fimo beads! Instead of using grit as you would to polish stones you need to use either wet and dry sandpaper or small, rounded, smooth but not polished, river rocks. If purchasing from a garden centre or builder's merchant here in the UK you need to be looking for pebbles or gravel from which you can pick out smooth pebbles that are no larger than 10mm and that are not jagged or cracked. If using wet and dry sandpaper either line your tumbler with it or cut it up into small pieces and don't forget to put some water in. If you want to buff your beads further then cut up small pieces of white denim or acrylic fleece and tumble that with your beads - this time without any water. If using a rubber barrel (not plastic) you may need to line it with a double thickness of denim to prevent discolouration of your beads.
I have always hand sanded my Fimo with wet and dry sandpaper as I don't own a stone tumbler and it is accepted as the best way to achieve the finest finish. (Always use it wet as that way the fine polymer clay dust is trapped in the water and you don't breath it in.) However, it does take quite a lot of time to achieve a superb shine - I tend to do it whilst watching tv as not only is it is time consuming but also thoroughly boring! I generally tend to start with a 360 micron and end with an 800 micron. For extra gloss you can then coat it with a layer of Staedtler's Gloss Lacquer - if sanded smooth before application I find you can't tell that it is coated in lacquer, all you see is an extra sheen. Also if you are happy using the lacquer you don't need to be quite so fussy with the sanding.
However, if you don't want to waste any time on sanding and polishing then a stone tumbler is the way to go - just leave it working for a few hours and let it do the work for you. Do bear in mind that it can be anything up to 6 hours for the first stage after which you will need to remove the rougher stones leaving only the really smooth ones for another 4-5 hours to achieve a truly polished look.
Happy Crafting everyone!
Fee x
Wednesday, 9 March 2011
What a month!
Hi Everyone
March's Product of the Month projects sheets are now available, and if you've never used Colourcraft's Brush® Sprays and Crystal Colours before, I strongly advise you to download them to give you inspiration on where to start. They are such highly pigmented colours you can create some truly lovely effects with them. Whether you're a card maker or scrapbooker I'm sure you'll find a use for them.
I've been having such fun with Colourcraft's Brusho® range I thought you might like to see extra pics of what you can do with them.
These scrapbook pages have had sprays & powders applied and then left to dry.

Some of them were then cut up and used as decorative backgrounds for some quick and easy photo cards.

I use kitchen roll to blot pages or mop up excess colour. I leave it on one side to dry and then lay it on a piece of old cloth with parchment paper over the top to iron it flat. This I also use as backgrounds on cards because you can get some really amazing effects!

I also love working with Colourcraft's Brusho® on Tyvek - you can create some wonderful pieces whether you heat them or just leave them as they are.

You can also cut out shapes before you heat it, as I've done below. Alternatively you can leave it as a basic shape such as a square for a card background.

If you do decide to have a go, don't forget you need to protect you work surface and hands etc with plastic and gloves as they are such intense colours they can even dye wood! (Which is handy if you are interested in making children's wooden toys!) If you are concerned about any colour coming off your work when finished don't forget you can spray with fixative (as you would when using chalks) or alternatively use varnish. For scrapbooking projects make sure you use an acid-free varnish.
I hope, whatever you do, you have fun being creative!
Fee x
Saturday, 1 January 2011
Wishing one and all a Happy New Year...
Hi Everyone,
Hope you all had a very Happy Christmas and managed to avoid the usual winter bugs that seem to be doing the rounds at the moment.
If you are a card maker or scrapbooker you may not have heard of this month's featured product. I would strongly advise anyone who is looking for something a little different or new to check out the Jo Sonja Texture Paste. It's a great product which can be used on card or 'beyond the page' projects.
A few tips for working with texture paste are:
1. You can thicken it by just adding a little baby powder.
2. If using a tube with a nozzle rather than a tub it is a good idea to either pop it in a glass of hot water or roll it between you hands to warm and soften it slightly. This will make it easier to pipe.
3. You can use a wet paint brush to shape and mould it for 3-D effects.
4. To make life easier when mixing paint and texture paste, rather than using a traditional paint palette, you can use old cat/dog food trays or, if you don't have a pet but drink coffee you can use the individual coffee filter lids because then you can just throw them away when you're done.
Hopefully Tracy from Suffolk will have received her bumper box of crafty goodies from the December Mailing List Prize Draw by now.

Don't forget, if you want to be in with a chance to win our January Prize (a pot of Texture Paste as well as a set of Jo Sonja Paints) and haven't already joined our mailing list you have until 10 January to do so.
All that's left to say is I wish you all a very Happy Crafty New Year!
love Fee x
Tuesday, 23 November 2010
Enamelling Fun!
Hi Everyone!
Just thought I'd let you see what my eleven year old niece and I did at the weekend. She wanted to make some Christmas presents for her school friends and as she had never done enamelling before I thought it might be fun.

Well, she took to it like a duck to water as you can see. So if you've got an arty young one in need of a birthday or Christmas present then I can highly recommend the Efco Efcolor Tealight Oven and Starter Set. It will give them hours of fun and make you very popular!
As I didn't want to worry about my Efcolor powders getting contaminated with mixed colours I got my niece to pour the excess powder onto another sheet of paper. (See below.)

The colours looked so amazing that I decided to have a play with them on some extra copper blanks. In fact, even my mum who hasn't enamelled before decided she fancied having a go! as you can see...
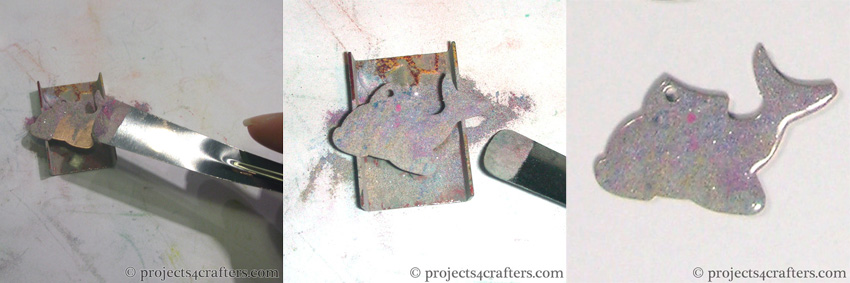
If you use your spatula like a shovel and pick up some of the powder on the end you can tap the spatula over the blank to distribute the powder. And these are all the pieces we ended up with...

Most of the colours are very subtle but it does give you an idea of what you can do by mixing the Efcolor powders. So never throw out old mixed powders as they could be used create some unusual effects or at least as a basecoat before applying the colours of your choice!
Till the next time...
Happy Crafting!
love Fee x
Friday, 12 November 2010
HobbyCrafts Show Follow Up
Hi Everyone!
Hope you are all managing to stay warm in the awful winds and rain we are experiencing in the UK at the moment. For those of you on the other side of the globe... don't forget to slap on the sun screen... and for those who are in the more wintry climes than us... much sympathy and don't forget to wrap up warm!
Now that that's all sorted I've been doing a little experimenting due to a question I was asked at the Hobbycrafts Show which was: Can you use ordinary glitter with the Efcolor Enamelling system? The conclusion I've come to is yes and no. Sorry folks, typically there isn't a straight forward answer. Basically, ye you can use other glitters - some work better than others (in fact some are a definite no no) - but none of them look or feel as good as Efco's Efcolor Glitter powders.
When you enamel with the glitter powders you end up with a beautifully smooth and glittery finish. However, the range is limited. (I shall have to have words with them and see if they can add more to the range, especially irridescent which is my all time favourite glitter.) That said I have tried with various makes and have come to the conclusion that all the glitters work best if you mix them with clear transparent powder before applying them to your blank. Art Institute and Jones Tones glitters which I absolutely love and use in lots of other ways don't appear to be able to cope with the heat as well as some others and can give patchy results. Impex micro fine glitters so far seem to come out tops but again tend to leave a somewhat rough finish.

The first sample is Art Institute Black glitter with clear transparent powder over the top which you can see has started to pull back in places. It is glossy in some areas and looks as if it has started to melt in others.
The second sample is Jones Tones Rainbow-Lites glitter mixed with white and clear transparent which again is ok in places but in others looks as though it has started to melt.
The last sample is Impex Fuschia Micro Fine glitter mixed with clear transparent which gives the most even finish although it is definitely rough compared with the Efcolor Glitter Powders.
Hope that helps anyone who has wondered about using glitters!
Happy Crafting!
Love Fee x
Tuesday, 5 October 2010
Projects4Crafters.com launch
Hi Everyone
Hello and welcome to the Projects4Crafters.com Crafty Li'l Blog!
The site launched today and hopefully will grow over the months and years and provide inspiration and crafty hints and tips for anyone who would like to get creative. Do get in touch if you need advice or help with your craft projects - I look forward to hearing from you!
Happy Crafting!
Subscribe to:
Posts (Atom)