Friday, 6 November 2015

More Efcolor Ideas

I hope everyone had an enjoyable and safe bonfire's night with spectacular fireworks! 

This week I've decided to share some more Efcolor ideas with everyone...

Firstly, I discovered some colour combinations live on air on Hochanda tv that I have never tried before:


Mixing coloured transparent Efcolor powders
The photo's not great but hopefully it shows that you can get a rather gorgeous purple by mixing blue and red transparent.


Mixing clear transparent with opaque black powder
I have covered glitter powders with coloured transparent before to achieve a subtle 'bling' but covering turquoise glitter with clear transparent and random 'splodges' of opaque black gave a star-like or universe effect. (Again the photo doesn't show it's true glory sorry!)


Coloured Transparent combined with Rubber Stamping
I have always covered rubber stamped images with clear transparent but have never thought to use some of the coloured transparent instead. btw Efco's texture mats are ideal for creating stamped images on pendants too. (Image: Paisley texture mat stamped with black Staz-on covered with red transparent.)

Secondly, you can enamel papier maché as Efco's Efcolor powders only need 150ºC to melt which is cool enough for both Efco's Papp Art and also thin layers of acrylic paint whether they are painted straight onto the papier maché or onto basecoats of enamel.


Paris Papier Maché


Materials needed:
Efco Paris Papp Art
Black acrylic paint
Black & Gold Efcolor Powders
Clear Flat-backed Swarovski Crystals (3, 4 & 5 mm)
Tweezers & Paint Brush
Efcolor Stove or Kitchen Oven
Optional: Varnish
(The Papp Art is a little too big for the stove but it can still be heated on it without the lid being used, it just takes a little longer.)


1. Paint the edges of the Papp Art with black acrylic paint and leave to dry.


2. Cover the papp art with black Efcolor powder and heat until it is melted.


3. When cool, cover the papp art with another layer of black Efcolor powder and patches of gold. Position crystals in the powder before placing it back on the heat to melt.


4. When cool, paint the back of the papp art with more black acrylic. 

If desired, you can coat the edges and back with varnish to protect the painted areas. Et voila! A quick and easy project.

Happy crafting!


Thursday, 29 October 2015

Hochanda Efcolor One Day Special

Well I've just about recovered, unpacked and tidied up the mess I had left behind me in the studio after last week's Hochanda tv one day special and all the prep beforehand. :)

I had planned to start posting on WOYWW before the show (as I have realised that accountability is good thing when it comes to making sure I post each week) but sadly there wasn't enough time. So I've decided to post my photos from the last two Wednesdays anyway. Here's what my desk looked like the Wednesday before the show...


As you can see I was busy making new samples for the show whilst watching Hochanda tv online... (Efco's Paris papp art is in the middle of being enamelled here).

And here's what it looked like the Wednesday after the show before I had a chance to tidy up (lol)...


All the last minute panic stations stuff left out where I had suddenly realised I'd forgotten to make some new jewellery to wear on the show and the mdf JOY that I ran out of time to enamel. :(

However I had a great time and everyone at the studios was really welcoming. The shows did well too as we sold out of the one day special and had to beg Germany for some more stock to last out the day!

Here's one of the new samples I created for the show...

Butterfly Easel Card


You will need: 
80 x 80 mm collage blank
Black and Clear Transparent Efcolor powder
Efco's A5 butterfly stencil
Iridescent acrylic paint (Jo Sonja's used here)
Flat-backed Swarovski Crystal
Sponge, Masking tape, Sanding pad & Tweezers
Peel off stickers, Card & Double-sided tape
Tea light stove


1. Lightly sand the collage blank to help key the Efcolor enamel. Wipe any grit from the surface.
2. Cover the blank with a layer of black powder and heat until it has melted.
3. If necessary apply another layer of black powder and reheat to achieve a smooth glossy surface.
4. When cool, lay the stencil over the top (secure with a piece of masking tape if needed) and use a sponge to apply a thin layer of iridescent acrylic over the design. Remove the stencil and leave to dry.
5. Cover with a thin layer of transparent powder before placing the blank back on the stove to heat.
6. As the powder melts you will be able to see the design again. Whilst still on the stove use tweezers to drop a crystal on the painted butterfly wing.
7. When the powder has completely melted and gone glossy remove the blank from the stove.
8. When cool, stick a sentiment on top of the enamel.
9. Take a 160 x 80 mm piece of card and fold it in two. Fold one half back on itself.
10. Use double-sided tape to stick the top half of the blank to the folded front of the card.


As ever, I wish you all happy crafting!


Saturday, 10 October 2015

Trick or Treat Sweetie Jar

Oh boy, am I overdue a blog post or what!?! It's been 3 months since my last one! Wow, where has the summer gone?! It will be Halloween before you know it! So in honour of the 31st October here's a project to create a spooky Glow-in-the-Dark Trick or Treat Sweetie Jar...


Materials:
Glow-in-the-Dark Cernit
Cernit Roller
Cernit Flexible Blade
Cernit Tools
Efco Roller Set
Glass Jar
Ceramic Tile for baking
Oven & Oven Thermometer
Optional: Ghost Template & Scissors


Step 1. Print out the template and cut out the ghosts. Enlarge or reduce it as necessary. Alternatively, you can draw your own ghosts on a piece of paper or even cut your ghosts out freehand.


Step 2. Take 2-3 strips of Glow-in-the-Dark Cernit and condition it. You can use a roller to do this to make it easier on your hands.


Step 3. Roll out the conditioned clay on a tile using the thicker pair of depth guides from the Efco Roller Set.


Step 4. Lay one of the ghost templates on top of the clay sheet and use the flexible blade to cut it out.


Step 5. Use the small spatula tool to remove the clay for the eyes and mouth.


Step 6. Remove the template and clean up any edges with the Cernit tools as necessary.


Step 7. Carefully lift the ghost off the tile so as not to distort it too much.


Step 8. Lay the ghost on the glass jar, gently pressing it to adhere it. 


Step 9. Use the Cernit tools to smooth and clean the edges as necessary.


Step 10. Cut out more ghosts, one at a time, adding them to the jar, making sure they all connect at various points.


Step 11. When you have a connected ring of ghosts around your jar you can bake it according to the manufacturer's instructions.

(Don't forget to pre-heat your oven & always use an oven thermometer.)

And this is what the jar looks like when the lights go out...


You can download a project sheet with the template from the Special Occasions section of Projects4Crafters.com 


Friday, 10 July 2015

Buongiorno!


Hi Everyone, I had a wonderful time visiting my cousin in Ischia...wow, what a tropical paradise! We ended up spending most of our time in the aptly named Giardino Eden - stunning views, delicious food, sunbeds by the sea, what more could a girl ask for?!

I had a lovely relaxing week which I really needed (I finally think I'm getting over the rotten bug my nephew kindly shared with me) but it's back to work now..

So, having had such a great time I thought I should start saving for my next trip and what better way to do that than use Efco's fab Papp Art Suitcase Money Box. 


Naturally, it needed some decorating first, so...

Vintage Suitcase Money Box

Materials needed:
Efco Papp Art Suitcase Money Box
Decorative Tissues or Napkins 
Matt Mod Podge
Brushes & Water
Acrylic Paints (green and yellow Decoupaint used here)
Baby Wipe

(Ideal Home Range Map Tissue was used here so 2 tissues were needed to cover the case. If you choose to use a napkin you will probably find that you can cover the whole case with just one.)

Step 1.
Remove the back two layers of the tissue and lay them to one side. Cover the front side of the money box with a coat of Matt Mod Podge.

Step 2.
Place the top layer of the tissue over the box positioning it so that there is a thin overlap at the bottom and at one side. Gently pat and smooth out the tissue to make sure it is adhered.

Step 3.
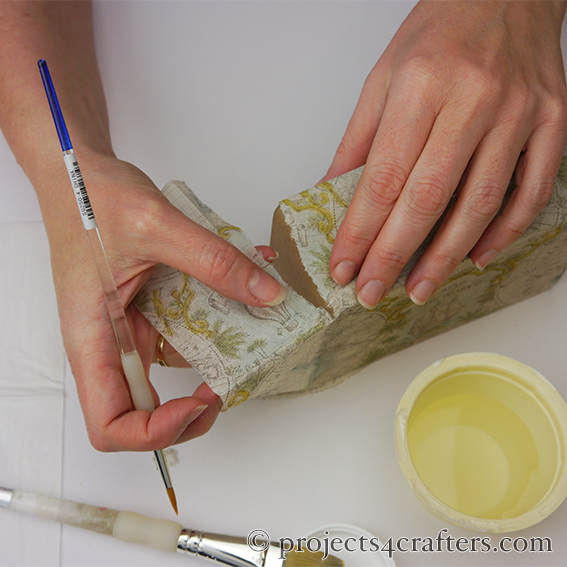
Fold the tissue over the top of the case and use a wet brush to tear it to allow the tissue to lie flat around the handle of the suitcase. You will have to create a flap of tissue to pass under the handle whilst removing two small squares at either end for the handle itself. (Don't worry if you tear more of the tissue than necessary as, if you are careful, it won't notice once it is stuck down.)

Step 4.
Continue to use a wet brush to create a 'cut' along the end of the top of the suitcase. Only tear along the top edge leaving a flap of tissue down the side.

Step 5.
Coat the top of the case with Mod Podge and carefully smooth the tissue down. 

Step 6.
Use a wet brush to open up the money slot. Carefully brush a little Mod Podge around the opening to stick any 'loose' edges.

Step 7.
Again, use a wet brush to feather any hard edges of the tissue. (You will find soft, feathered edges blend in more easily than hard ones.)

Step 8.
Coat the side of the case with Mod Podge and carefully wrap the excess tissue around, smoothing it as you go.

Step 9.
Use a wet brush to remove the excess at the top edge, making sure that the tissue slightly overlaps the tissue which is already stuck down on the top. Ensure the edges are stuck with a little more Mod Podge.

Step 10.
Take another top layer of a tissue and stick that to the back of the case with Mod Podge, making sure there is enough excess to fold around the other side and the bottom of the case. Apply more Mod Podge to the side and wrap the tissue around, carefully sticking it in position.

Step 11.
Use a wet brush to remove the excess tissue from the top and sides, making sure to feather any hard edges. Remove the plastic bung from the bottom of the case before wrapping the tissue around and removing the excess.

Step 12.
Fold the tissue back and apply Mod Podge to the bottom of the case. Carefully smooth the tissue back around, making sure that all the edges are stuck down.

Step 13. 
Use a wet brush to tear the tissue covering the hole before using Mod Podge to wrap and stick the excess around to the inside. Use your finger to make sure the tissue is firmly stuck to the inside of the case.

Step 14.
Cover the decoupaged areas of the case with 2-3 coats of Mod Podge to seal it. Allow to dry between each coat. (This will have to be done in stages but can be sped up by using a hair dryer.)

Step 15.
For an antique leather effect handle stick torn pieces of the discarded layers of tissue to cover the handle, making sure to create creases and ridges. Leave to dry.

Step 16.
Pick a colour from your tissue (green used here) and paint the handle with acrylic paint using either your finger or a brush. (Alternatively you could use brown acrylic paint for a leather effect.) You can use a baby wipe to remove any paint that goes over the decoupaged areas as they have been sealed by the Mod Podge.

Step 17.
Pick up a little yellow acrylic (or dark brown if going for an aged leather effect) on a baby wipe and rub over the painted handle. Give it a good hard rub so that you remove some of the paint off the raised areas for a distressed look.

Step 18.
Finish off by applying 2-3 coats of Mod Podge to the handle for protection.

All that's needed now is a luggage tag with the destination of the holiday I'm saving for! (Oh, and a load of money to fill it!) ;)  hmmm.... I wonder where I should go next....