Saturday, 8 December 2012

Efco Storage Jars

Hi Everyone

Efco do a range of Storage Jars which are ideal for personalizing! You can create decorative storage for around the home or turn them into attractive, multipurpose packaging for Christmas presents! There are two new project sheets on the glass painting page of Projects4Crafters which use Efco's fab Color Dekor 180.


DP/0020 - Striped Jar


DP/0021 - Floral Jar

Color Dekor is a fabulous product as it makes decorating round objects a breeze. It is paint in sheet form which can be cut or punched. Once baked at 180ºC for 30 minutes it is hand washable. Your finished items will be smooth and run-free!

If you're into home baking and want to give your creations away as presents then the larger storage jars are ideal for packaging your wares...


If you're giving sweeties at Christmastime then you can make them extra special by 'wrapping' them in a unique storage jar. The fir tree felt border was stuck on the jar below with a hot glue gun and then it was finished off with a bow. The Color Dekor range also has black and gold letters so why not personalize the jar first with the child's name on the lid!


If you're looking for a new way to wrap up a selection of toiletries this Christmas then why not try one of Efco's largest storage jars...


This one has diecut straw paper fir trees stuck on, with Efco's Snow Liner adding a touch of snow to the tree tops. It has then been finished off with a ribbon!

'Cookie in a Jar' pressies seem to be very popular this year, so why not make your own by decorating one of Efco's large or medium sized Storage Jars! Here, the word 'COOKIES' and a holly motif have been punched from their Color Dekor 180 sheets and stuck on. Once baked in the oven for 30 minutes at 180ºC it is then hand washable. Leave it to cool before adding your Cookie Mix ingredients. 


There are a range of cookie in a jar recipes available for free at AllRecipes.com

If you want to use a medium sized jar like the one above rather than a large one you may need to halve the ingredients. I chose the 'Cookie-in-a-Jar I' recipe which would normally make 4 dozen cookies but I halved the ingredients to fit the jar. Don't forget to write out the instructions for making the cookies and attach this to the jar. (If you've halved the ingredients you will have to remember to halve the remaining ingredients on the instructions too ie butter and eggs.) By decorating and personalizing the jar you make that part of the present, a very important part too as the cookies will soon be eaten but the jar will still be there!

There are so many different ways you can decorate storage jars but Efco's Color Dekor is definitely a quick and easy way when you're pressed for time!

Happy Crafting!

Fee x

Sunday, 2 December 2012

Quilled Christmas Decoration

Hi Everyone

If you're getting into the festive mood then why not create your own Christmas decorations. There are various project sheets available on the website. Check out: http://projects4crafters.com/Special-Occasions(2296752).htm  

However, if you enjoy papercraft techniques then why not try this Quilled Decoration which I've just uploaded to the Papercrafts section...

P/0003 - Quilled Decoration


Materials needed:
Christmas Quilling Set
Dekofix Glue
Transparent Thread
Topaz Acrylic Gems 4mm
Extra Pins
Scissors


Step 1.  Cut 7 4mm strips of quilling paper into quarters (gold has been used here). (A) Take 4 pieces and create scrolls by curling first one end into a round and then curling the other end in the opposite direction. Make one end slightly larger than the other. The more uniform the shapes are the more symmetrical the finished decoration will be. (Smear a little glue over the ends to help them hold their shape.) (B) Take 4 pieces and curl one end into a round, leaving a 15mm tail. Use your finger nail to gently curl this slightly in the opposite direction. (C) Take 4 pieces and curl one end into a round, this time leaving a 20mm tail. Again curl this in the opposite direction, making the end a slightly tighter curl. (D) Roll 8 pieces into 10mm rounds, gluing the ends of the strips to fix them. Pinch them to create drops. (E) Roll the last 8 pieces into 10mm rounds, gluing the ends of the strips to fix them.


Step 2. Take the 4 scrolls (A) and stick them smaller ends together to create a cross shape.


Step 3.  Take the longer tailed rounds (C) and fix them to the arms of the cross shape by wrapping and gluing the ends around the ends of the scrolls. Fix the shorter tailed rounds (B) to the back of the (C) sections by gluing the ends of the tails to the back of the scrolls and the rounds back to back with the rounds of the longer tailed sections.


Step 4.  Add 2 drops (D) with a round (E) in between the drop points in between each arm of the decoration.


Step 5.  Add the last rounds (E) to the end of each arm. Stick them into the curls of the (C) sections.


Step 6.  Use more Dekofix glue to stick some acrylic gems on. Stick one in the centre of the decoration, one at the beginning of each arm and one towards the end of each arm.


Step 7.  When dry, turn the decoration over and stick gems on the other side. Finish by feeding a length of transparent thread through the top of one arm to create a hanger.


For a downloadable version of this project go to: http://projects4crafters.com/Papercrafts(2296746).htm

Of course, if you like a lot of bling for Christmas, before sticking the gems on in Step 6 you could spray the decoration with spray adhesive and dip it in ultrafine glitter.

You don't have to make your decoration gold either, as you can choose paper and gem colours to tie in with your Christmas theme. 

Happy papercrafting!

Fee x

Saturday, 1 December 2012

Efcolor Leaf Windchimes

Hi Everyone

Here's a rather topical project, what with all the leaves turning beautiful colours and falling from the trees. They are easy to create using Efco's Efcolor enamel powders...

EN/0034 - Leaf Windchimes


Materials needed:
Leaf Copper blanks
Efcolor Powders
Efcolor Tealight Stove
Deco Wood
Transparent Thread
Gold Flat Beads
Dekofix Glue
Fine Sandpaper
Pliers & Scissors 


Step 1.  Lightly sand the leaf copper blanks on both sides and wipe them on a clean cloth to remove any grease or grit.


Step 2.  Cover each blank in a good layer of powder, adding touches of other colours as desired. Place them on the tealight stove until the powder has melted. Then remove them & leave to cool.


Step 3.  Turn the blanks over, and repeat Step 2 for the other side, this time placing each blank on the stand to both heat and cool.


Step 4.  Join 2-3 leaves together with transparent thread. Tie knots in the thread and secure with a touch of Dekofix glue. For a stronger finish you can use flat beads squashed with pliers to secure the thread.


Step 5.  Lay the threaded leaf sections out roughly how you would like them to hang in relation to each other. Fix more transparent thread to the top leaves, leaving a long length to attach them to the wood pieces.


Step 6.  Attach the tops of the threads to pieces of wood, using glue to fix them in position. Keep checking how they hang and make adjustments as necessary by sliding the threads along the wood pieces to balance them.


Step 7.  For extra strength use two strands of thread to attach the wood pieces together and to create a hanger for the top piece of wood.

If you'd like a downloadable version of the project go to http://www.projects4crafters.com/Enamelling(2296749).htm

Happy Crafting to one and all

Fee x

Wednesday, 28 November 2012

November Product of the Month

Hi Everyone

What a busy month November has been. Besides the ongoing work on the new website (almost there!), I also had an enamelling show on Ideal World tv to prepare for. Sadly, the show was 'a bit of a disaster darling' with the air conditioning blowing gale force cold air across the set which meant I couldn't do a single demo! Usually, when enamelling in the studio I can see the powder melting within a minute or even seconds but not one piece lost the powdered look in the whole hour of the show (rather frustating after struggling to land some powder on the blank in the first place!). When I looked at the tealights underneath the flames were positively horizontal! No wonder the stove never got hot. Having said that, the producers were so happy with the samples that I had taken with me and with the fact that despite everything we sold out of the stoves, that they have asked if I would go back and do another two shows. So watch this space to find out when they will be on...

In light of the Ideal World tv show I decided to feature Efco's Efcolor Enamelling as the November Product of the Month. I know it was one of the products I featured on the website when it first started back in 2010 but it never hurts to revisit a product, especially when it has evolved and grown over the years. So here are the new projects to tie in with the Jewellery theme of the show:


At the end of the month you will be able to find these projects along with many other Efcolor enamelling project ideas on the enamelling page of www.Projects4Crafters.com.

Happy Crafting

Fee x

Tuesday, 6 November 2012

A rather long post!

Hi Everyone

Sorry I haven't 'blogged' recently - it's been rather crazy in the Creative Craftworks studio this last month. Here's a quick catch up for those of you who don't follow the facebook page...

Efco do a fabulous set of three little PappArt boxes, perfect for filling with sweets and hanging on the tree at Christmas time. 

The first box is in the shape of a Santa's boot which I've painted with red Decoupaint and Efco's Snow Liner paint and decorated with gems.


The second box is in the shape of a little Christmas tree which I've covered with Efco's Relief Paste for a textured look. When dry, I painted it with dark green acrylic and then dry brushed a lighter green over the top to give it depth. The trunk was painted brown and then it was decorated with glitter thread and gems.  
 

Last but not least is the Star which, having basecoated it with white Decoupaint and a few random splodges of light blue Decoupaint, I decoupaged with a napkin and sparkle Mod Podge. When dry, I stuck small gems in the middle of the snowflakes with Dekofix glue.


I had a wonderful day at Colemans Craft Warehouse on Saturday 27th October for their Big Demo Day. Both staff and customers were lovely. I had a great time demonstrating assorted techniques for creating Christmas decorations. I also uploaded a new project sheet to the Special Occasions Page: Festive Xmas Lights 


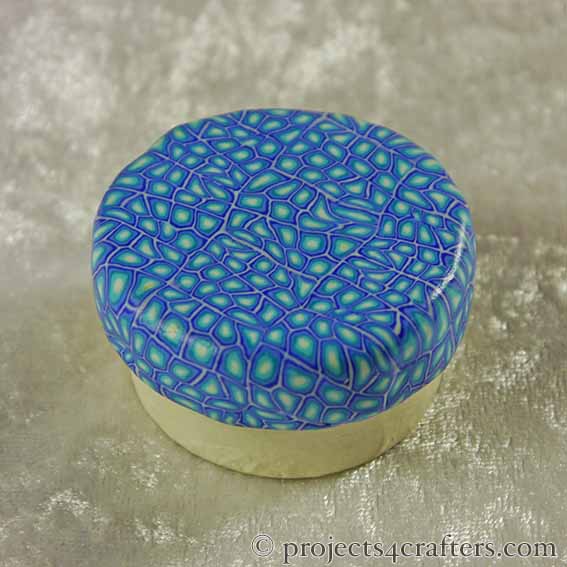
If you like making jewellery for presents, whether beaded or enamelled, then you might like to make your own decorative jewellery boxes from mini Papp Art boxes. Make them distinctive and unique by using the Bullseye Cane technique guide on TheCraftLibrary.com site to decorate the box lid with Fimo. All you need to do then is to paint the base with acrylic paint to finish.


Here's a few more Christmas decoration ideas I've been working on over the last few weeks:


Last, but not least, I will be appearing on Create and Craft tv at 1pm on Tuesday 13th November where I will be demonstrating Efco's fantastic Efcolor Enamelling Range. If you've not discovered Efco's low temperature enamel powders and tealight stove I suggest you watch the programme as not only is it a lot of fun to do but it would also make a great Christmas present for a crafty friend! Here's a taster of the sort of jewellery you can create with this fab product:


Hope you can make it!

Fee x

Wednesday, 17 October 2012

A little more Christmas Inspiration...

Here are some variations on this month's Christmas Decoration Theme:


This felted heart is easy to create using an Efco polystyrene heart as the base. Needle felt it with red wool, tie a gold ribbon around it and push a plastic hanger into the top for the cord.


This pink bauble is made using a polystyrene ball as a base. It was divided it up into quarters which were then felted with pink and purple wools. Silver ribbon was fixed with pins and beads. The felt stars were attached by needle felting them to the wool background and gems were added with Dekofix glue.
 

You can create striped effects by felting a polystyrene ball with a base colour and then laying thin sections of wool fibres over the top which are then felted to the base using a felting needle. Ribbons, beaded pins, sequins and gems are then added for extra decoration.


Efco's plastic drops are a beautiful shape and, provided you use small napkin motifs, they can still be decoupaged in the same way as the bauble in Project SO/0008M. You don't have to crackle the painted background if you don't want to and you can add a decorative ribbon as a finishing touch if desired. To make it hold is twirly shape use tiny pieces of double-sided tape to stick it to the plastic bauble.


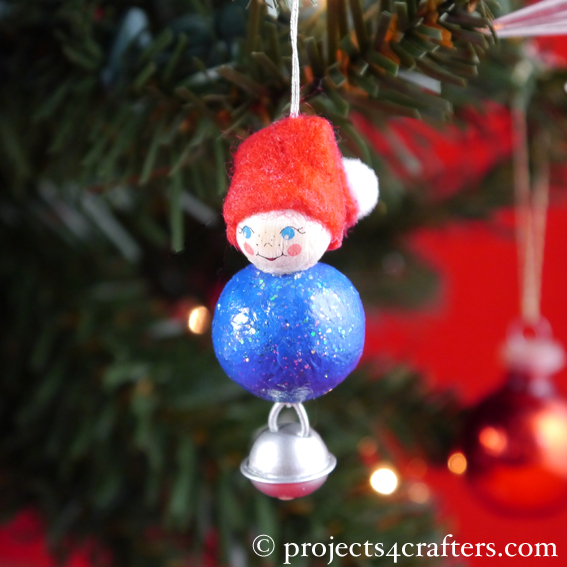
If you prefer your Santa to have a more traditional look with his hat folded over rather than standing to attention as in Project SO/0010M just thread the cord through the centre of the felt for the hat rather than the tip. That way you can fold it over, using a dab of glue to hold it in place, and add a small white pompom at the tip.


 It doesn't matter whether you prefer a more contemporary look for your decorations or more traditional colours, if you use Efco's wire stars as a base, you can create you own beaded decorations to tie in with your chosen theme.

I hope these decorations have inspired you to have a go at making your own this year. You could even make it a family event by getting the kids involved! If you need a little help to get started check out this month's Product of the Month page at Projects4Crafters.com

Happy Crafting!

Fee x 

Saturday, 13 October 2012

Christmas Decorations for October!

Hi Everyone

This month there isn't a featured product as such, but more of a 'Christmas Theme'...

 Decoupaged Bauble
(SO/0008M)

Snowman
(SO/0009M) 

Father Christmas
(SO/0010M) 

Felted Bauble
(SO/0011M)
  
Using Efco's fab range of polystyrene shapes, plastic 2 part baubles, cotton balls and extensive decorative elements and embellishments you can create truly unique and diverse decorations. Check out this month's Product of the Month page for instructions on how to complete the featured decorations above. For inspiration on creating other Christmas decorations such as 'fir cone choirboys' check out the Special Occasions page. Alternatively, if you're into beads, why not try one of the bejewelled wire stars like the one below which can be found on the Beading page.


There's nothing like unpacking the family Christmas decorations and finding ones created years ago by the children, so why not start creating memories for the future by making one of this month's projects with your own children.

Happy Crafting everyone!

Fee x