Hi Everyone
This week I've got a sweet little fairy house made from Cernit polymer clay. I had such fun creating the larger fairy house (Project Sheet PC/0013 which comes in two parts and is available to download for free from the Polymer Clay section of my website) that I wondered what it would look like if I made it in some of Cernit's newer colours and on a smaller scale too...
Materials needed:
Tiny Terracotta Pot
6mm & 10mm Round Circle Cutters (PME)
Cernit No.1 Polymer Clay:
Turquoise (79 412 80)
Coral (79 417 54)
Sahara (79 417 47)
Vanilla (79 417 30)
Raspberry (79 414 81)
Anis Green (79 416 01)
Cernit Knives (79 999 03)
Cernit Tools (79 999 06)
Cernit Stainless Steel Roller (79 999 02)
Oven & Oven Thermometer
Kitchen Foil, Scissors & Tweezers
Pasta Machine (Optional)
Wooden Skewer & Pliers
Ceramic Tile for working on and baking
(Product codes from Efco)
Step 1. Turn the tiny terracotta pot upside-down and crunch some kitchen foil on top of the base into the shape of a wonky cone. Wrap the outside of the pot with more foil, securing the cone in place. Fold the excess foil at the bottom around the edge to the inside of the pot.
Step 2. Condition some vanilla Cernit No.1 by warming it and manipulating it in your hands. (If you have a dedicated polymer clay pasta machine you can use this to condition the clay instead - it's easier on the hands doing it this way!) Roll the clay out into thin sheets, wrapping it around the pot on top of the foil. Trim the excess at the bottom and smooth the joins.
Step 3. Condition some turquoise, coral, sahara and more vanilla Cernit No.1. Mix the turquoise with some vanilla and sahara (approx. 2:2:1). Mix the coral with vanilla (approx 1:1). Roll out all four colours and cut them into assorted sized thin strips.
Step 4. Cut pieces off the strips and press them on top of the vanilla clay, starting from the bottom and working your way up towards the cone in uneven rows. Leave an archway open for the doorway and stop adding rows when you reach the start of the cone. Use the spatula from the Cernit tool set to smooth the joins and deepen the grooves between the 'stones' or 'bricks'.
Step 5. Remove the vanilla clay from the arched doorway. Use the 6mm circle cutter to create a window either side of the doorway and the 10mm cutter to create larger windows at the sides and back. Use the spatula to ease out the clay if necessary.
Step 6. Add more pieces of clay to edge the door arch and windows. Use the spatula to smooth the joins and deepen the grooves between the pieces.
Step 7. Condition more turquoise Cernit No.1 and roll it out. Cut it into strips and then rectangles. Use the 10mm circle cutter to round off the ends to create roof tiles. Create 3 or 4 coral tiles too.
Step 8. Position the tiles in a row around the top of the wall. Press the base of them onto the vanilla clay to secure them leaving the rounded bottom edges curved out.
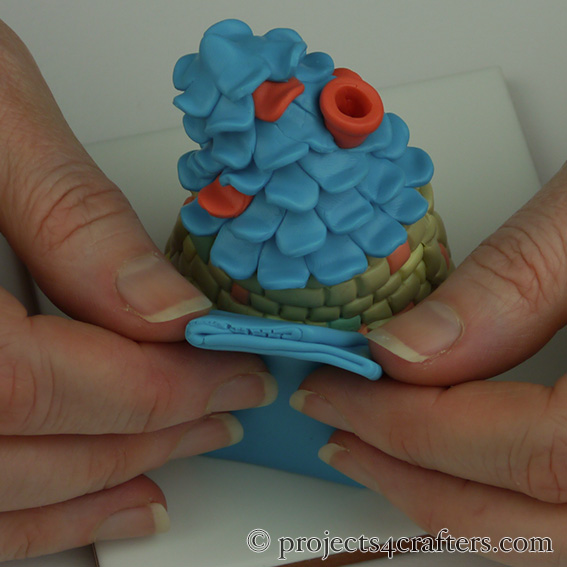
Step 9. Continue adding rows of tiles around the cone, allowing each row to overlap the previous one. Try and stagger the tiles and add an odd random coral tile. When you reach the tip of the cone pinch the base of the tiles into a soft point, smoothing over the joins.
Step 10. Wrap a wooden skewer with a strip of foil. Condition and roll out more coral Cernit No.1. Cut a small strip and wrap it around the foil covered skewer, cutting away the excess and smoothing over the join. Cut an even thinner strip and gently press this on top at one edge, cutting away the excess and again smoothing over the joins.
Create a hole in the roof with the 10mm cutter, removing the clay with a spatula if need be.
Step 11. Slide the 'chimney' off the skewer and remove the foil. Slide the chimney into the hole in the roof.
Step 12. Smooth the tiles around the edges of the chimney to secure it in position.
Step 13. Roll out some more conditioned turquoise Cernit No.1, this time making it thick for a door. Cut the bottom edge straight before gently pressing it up against the arched doorway opening.
Step 14. Use the clay impression as a guide for cutting out the door. Use the spatula to create two deep grooves in the clay. Make more light random grooves all over the surface for a wood effect.
Step 15. Condition a little coral Cernit No.1. Roll a small ball for a door knob. Roll two small sausages and pinch them at either end to create hinges.
Step 16. Use the hinges to attach the door to the archway, leaving it slightly ajar.
Step 17. Make tiny toadstools by rolling turquoise Cernit No.1 into a small ball. Use the large pointed tool to create a depression in it and at the same time shape the clay into a toadstool cap. Roll tiny balls of vanilla Cernit No.1 and press them into the turquoise clay for spots. Roll a small sausage of vanilla clay, pressing a little harder at one end to create a slight cone shape. Push the pointed end into the depression in the toadstool cap.
Create a short groove at the base of the house's wall where you want to add a toadstool. Carefully press a toadstool into the depression created. Use a tool to make sure the edges of the toadstool stalk have bonded with the clay of the wall.
Condition some anis green Cernit No.1. Roll it into an ultra thin sausage, breaking small pieces off as you go. Use a pointed tool to press them onto the base of the house and over the toadstool stalks.
Step 18. Roll out some more anis green Cernit No.1 for the rambling rose stems. Press it onto the wall, starting at the base by the door and working up around the windows and over the door arch in wavy lines.
Step 19. Roll tiny balls of coral Cernit No.1 and squash them flat to create little flowers. Press them into the wall around the bottom of the house using a pointed tool in the centre of each one.
Step 20. Condition some coral and raspberry Cernit No.1. Mix some of both clays together 1:1 to create a third colour. Roll the mixed clay and the coral out thinly and cut them into strips. Use the wavy knife to cut curved wavy edged pieces. Roll a piece of clay with the wavy edge at the top. Start tightly, loosening off as you go and gathering little pleats towards the outside. Tear off any excess clay when the flower is large enough. Squeeze the base of the flower, pinching off the excess clay as you shape the bottom of it. Use a pointed tool to carefully bend the tips of the petals outwards. Vary the size of the flowers for interest.
Step 21. Take tiny pieces of anis green Cernit No.1 and roll them firstly into balls and then into cone shapes. Squash them flat with your finger and then use the spatula to create a groove down the length of the 'leaves' in the centre.
Step 22. Use the raspberry Cernit No.1 to make rosebuds. Roll tiny pieces into oval shapes. Take a couple of leaves and wrap them around the base of the oval, coming up either side with the tips of the leaves curling outwards.
Step 23. Use the spatula to adhere leaves to the house randomly along the rose stems.
Step 24. Position the flowers randomly along the stems, using the pointed tool to press their bases into the clay of the wall. If necessary, you can carefully press down the centre of the flower too.
Step 25. Use the spatula to apply more leaves around the base of the flowers.
Step 26. Add rosebuds at intervals along the stems, carefully pressing at their bases to adhere them to the clay walls.
Step 27. Roll two tiny balls of turquoise Cernit No.1 clay and press them into the centre of the door hinges.
Step 28. Very carefully make sure you can remove the terracotta pot. (You want to leave it in as a support whilst you bake the clay but you also want to make sure you will be able to remove it afterwards. As the Cernit will shrink slightly whilst baking you need to make sure that it isn't already gripping the pot tightly or else you will struggle to remove it afterwards.)
Bake the house on a ceramic tile following the manufacturer's instructions (110-130ºC for 30 minutes).
Step 29. Allow to cool after baking. Then carefully remove the pot and tear away the foil from the inside of the house. You may find it easier to use pliers to remove the foil from the roof area of the house.
Your fairy house is now ready for occupation! ;) You could pop it over a battery operated nite lite or leave it as an ornament...the choice is yours!
And here is the larger version...
It's amazing how different these two houses look considering they are created in very similar ways - the only real difference is the colour of the clays used. I hope you feel inspired to create your own fairy house and please do email any photos to the website or share them on the Facebook page.
Happy modelling everyone!