
Hi Everyone, I had a wonderful time visiting my cousin in Ischia...wow, what a tropical paradise! We ended up spending most of our time in the aptly named Giardino Eden - stunning views, delicious food, sunbeds by the sea, what more could a girl ask for?!
I had a lovely relaxing week which I really needed (I finally think I'm getting over the rotten bug my nephew kindly shared with me) but it's back to work now..
So, having had such a great time I thought I should start saving for my next trip and what better way to do that than use Efco's fab Papp Art Suitcase Money Box.

Naturally, it needed some decorating first, so...
Vintage Suitcase Money Box
Materials needed:
Efco Papp Art Suitcase Money Box
Decorative Tissues or Napkins
Matt Mod Podge
Brushes & Water
Acrylic Paints (green and yellow Decoupaint used here)
Baby Wipe
(Ideal Home Range Map Tissue was used here so 2 tissues were needed to cover the case. If you choose to use a napkin you will probably find that you can cover the whole case with just one.)
Step 1.

Remove the back two layers of the tissue and lay them to one side. Cover the front side of the money box with a coat of Matt Mod Podge.
Step 2.

Place the top layer of the tissue over the box positioning it so that there is a thin overlap at the bottom and at one side. Gently pat and smooth out the tissue to make sure it is adhered.
Step 3.


Fold the tissue over the top of the case and use a wet brush to tear it to allow the tissue to lie flat around the handle of the suitcase. You will have to create a flap of tissue to pass under the handle whilst removing two small squares at either end for the handle itself. (Don't worry if you tear more of the tissue than necessary as, if you are careful, it won't notice once it is stuck down.)
Step 4.
Continue to use a wet brush to create a 'cut' along the end of the top of the suitcase. Only tear along the top edge leaving a flap of tissue down the side.
Step 5.

Coat the top of the case with Mod Podge and carefully smooth the tissue down.
Step 6.

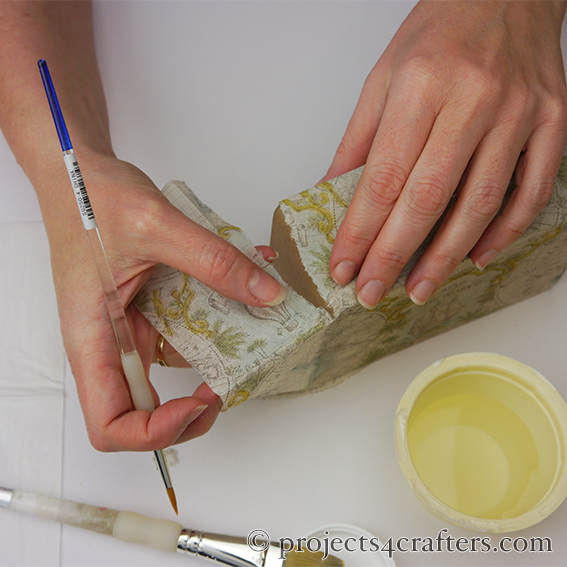
Use a wet brush to open up the money slot. Carefully brush a little Mod Podge around the opening to stick any 'loose' edges.
Step 7.

Again, use a wet brush to feather any hard edges of the tissue. (You will find soft, feathered edges blend in more easily than hard ones.)
Step 8.

Coat the side of the case with Mod Podge and carefully wrap the excess tissue around, smoothing it as you go.
Step 9.

Use a wet brush to remove the excess at the top edge, making sure that the tissue slightly overlaps the tissue which is already stuck down on the top. Ensure the edges are stuck with a little more Mod Podge.
Step 10.

Take another top layer of a tissue and stick that to the back of the case with Mod Podge, making sure there is enough excess to fold around the other side and the bottom of the case. Apply more Mod Podge to the side and wrap the tissue around, carefully sticking it in position.
Step 11.

Use a wet brush to remove the excess tissue from the top and sides, making sure to feather any hard edges. Remove the plastic bung from the bottom of the case before wrapping the tissue around and removing the excess.
Step 12.

Fold the tissue back and apply Mod Podge to the bottom of the case. Carefully smooth the tissue back around, making sure that all the edges are stuck down.
Step 13.


Use a wet brush to tear the tissue covering the hole before using Mod Podge to wrap and stick the excess around to the inside. Use your finger to make sure the tissue is firmly stuck to the inside of the case.
Step 14.

Cover the decoupaged areas of the case with 2-3 coats of Mod Podge to seal it. Allow to dry between each coat. (This will have to be done in stages but can be sped up by using a hair dryer.)
Step 15.


For an antique leather effect handle stick torn pieces of the discarded layers of tissue to cover the handle, making sure to create creases and ridges. Leave to dry.
Step 16.

Pick a colour from your tissue (green used here) and paint the handle with acrylic paint using either your finger or a brush. (Alternatively you could use brown acrylic paint for a leather effect.) You can use a baby wipe to remove any paint that goes over the decoupaged areas as they have been sealed by the Mod Podge.
Step 17.

Pick up a little yellow acrylic (or dark brown if going for an aged leather effect) on a baby wipe and rub over the painted handle. Give it a good hard rub so that you remove some of the paint off the raised areas for a distressed look.
Step 18.

Finish off by applying 2-3 coats of Mod Podge to the handle for protection.

All that's needed now is a luggage tag with the destination of the holiday I'm saving for! (Oh, and a load of money to fill it!) ;) hmmm.... I wonder where I should go next....
