
Thursday, 24 December 2015
Friday, 18 December 2015
Christmas Crafts for Kids
With Christmas fast approaching, everyone present shopping and children getting excited I've decided to post some links to some great Christmas Crafts for Children...


Hopefully you'll find something amongst the links above to keep the kids busy whilst you get the presents wrapped and the house ready for the festive season!
Happy Holidays Everyone!
Friday, 11 December 2015
Das Air Dry Clay
Well, that's the last Hochanda tv shows for this year. I had such fun playing with Das clay, coming up with ideas for the shows, even if I was a little pushed for time what with it being air drying and the weather being so damp lately.
Das air dry clay is a fabulous product ideal for both young and old. It's light but dries rock hard and best of all it's cheap! You can use it to decorate cards if you're a card maker, use it in mixed media projects and for home decor too.
A few tips for working with Das clay are:
* Use a little water to smooth the clay surface.
* Use two rulers or pieces of card when rolling out your clay to make sure it's an even thickness.
* If you get interrupted whist working with the clay you can wrap it in baby wipes to keep it workable for several minutes without drying out at all.
* You can colour the clay with Pan Pastels and inks - if using Pan Pastels add a few drops of water as well. You can dust the wet clay surface with Pan Pastels to colour it too.
* To create an embossed surface pattern in the clay either rubber stamp into it or lay a stencil over the surface and gently roller over it.
* You can use cake decorating moulds to create decorations to add to your projects. If necessary smear a little vaseline around the mould first to help release the clay.
* If joining two pieces of wet clay always score the areas to be joined and wet them slightly. As you join them gently manipulate them, e.g. twist them slightly, to encourage them to bond.
* Smooth cut edges of clay with a wet finger.
* Shape the clay whilst wet and leave it supported using foil or other items whilst it dries. Remember the clay shrinks slightly as it dries so make sure to use some sort of release when moulding it around objects if you don't want it to be permanently attached e.g. cling film.
* Wrap any unused clay in it's packet and any coloured up clay in a baby wipe before placing it in an airtight container - I usually use two ziplock bags, one inside the other and, if I think it's necessary I'll even wrap the packet or baby wipe in clingfilm first too. If leaving the clay for more than a day, check on it every couple of days, spritzing it with water to keep it moist if it looks as though it is starting to dry out slightly.
* When dry you can colour the clay with a wide variety of media including paints, pastels and pens.
* Use cheap hair spray to fix Pan Pastels when the clay is dry.
* Use spray varnish to seal your dried projects, making them stronger and protected especially if they're likely to be handled a lot.
* You can add drops of essential oil to the back of dry clay pieces to turn them into scented decorations.
Here are a few photos of a few projects I did for the shows...

This door plaque was made entirely from Das clay except for the letters which were some of Efco's chipboard letters (because I ran out of time to make them from clay). The flowers and leaves were created using a Mod Podge Mold and stuck onto the background clay whilst still wet. When dry the entire plaque was painted with black gesso and left to dry again before being coloured up with Pan Pastels.

This leaf dish was created by rolling out the clay and pressing a plastic leaf from a silk flower arrangement into it to get an impression. The 'leaf' was then cut out and the process repeated twice more. The clay leaves were then positioned overlapping each other, making sure they bonded where they overlapped and left to dry supported by a dish to keep their shape. When dry, the dish was painted with brown acrylic paint before metallic Pan Pastels were applied over the top.

You can jazz up old Christmas decorations with Das clay using cake decorating moulds to create little clay adornments. These should be fixed to the baubles whilst wet and left to dry in position. When dry you can remove the decorations or fix them permanently with a touch of glue.

You can create decorative bowls and dishes with Das clay. Roll out the clay, lay a stencil over the top and gently run your rolling pin over the top. Carefully peel the stencil off the surface of the clay. Take a bowl and lay it upside down on the clay and cut around it. Remove the bowl and smooth the edges of the clay. Place the clay inside the bowl, shaping it as desired, and leave it to dry.

This clay nightlight was created to decorate a small glass nightlight holder. First some Coarse White Pan Pastel Medium was added to the clay to give it a subtle sparkle. Then it was rolled out and cut into a strip of clay which was wrapped around the glass nightlight. The join was smoothed over using clay tools and drops of water. Mini cookie cutters were used to create the heart and star cutouts before it was left to dry.

These little decorations were created by rolling out some clay and then positioning stencils over the top before gently rolling over the clay once more. Some Pan Pastels were applied over the top using a Sofft tool before the stencils were removed. A heart cookie cutter was used to cut the shapes out and a straw was used to create the hole for the ribbon. They were then left to dry before a few drops of essential oil were added to the backs and left to soak in. These make great card toppers which are also little tokens or presents for the receiver to use to fragrance a wardrobe, room or car.
For more inspiration check out the Air Dry Clay Pinterest board.
Happy Crafting!
Das air dry clay is a fabulous product ideal for both young and old. It's light but dries rock hard and best of all it's cheap! You can use it to decorate cards if you're a card maker, use it in mixed media projects and for home decor too.
A few tips for working with Das clay are:
* Use a little water to smooth the clay surface.
* Use two rulers or pieces of card when rolling out your clay to make sure it's an even thickness.
* If you get interrupted whist working with the clay you can wrap it in baby wipes to keep it workable for several minutes without drying out at all.
* You can colour the clay with Pan Pastels and inks - if using Pan Pastels add a few drops of water as well. You can dust the wet clay surface with Pan Pastels to colour it too.
* To create an embossed surface pattern in the clay either rubber stamp into it or lay a stencil over the surface and gently roller over it.
* You can use cake decorating moulds to create decorations to add to your projects. If necessary smear a little vaseline around the mould first to help release the clay.
* If joining two pieces of wet clay always score the areas to be joined and wet them slightly. As you join them gently manipulate them, e.g. twist them slightly, to encourage them to bond.
* Smooth cut edges of clay with a wet finger.
* Shape the clay whilst wet and leave it supported using foil or other items whilst it dries. Remember the clay shrinks slightly as it dries so make sure to use some sort of release when moulding it around objects if you don't want it to be permanently attached e.g. cling film.
* Wrap any unused clay in it's packet and any coloured up clay in a baby wipe before placing it in an airtight container - I usually use two ziplock bags, one inside the other and, if I think it's necessary I'll even wrap the packet or baby wipe in clingfilm first too. If leaving the clay for more than a day, check on it every couple of days, spritzing it with water to keep it moist if it looks as though it is starting to dry out slightly.
* When dry you can colour the clay with a wide variety of media including paints, pastels and pens.
* Use cheap hair spray to fix Pan Pastels when the clay is dry.
* Use spray varnish to seal your dried projects, making them stronger and protected especially if they're likely to be handled a lot.
* You can add drops of essential oil to the back of dry clay pieces to turn them into scented decorations.
Here are a few photos of a few projects I did for the shows...


You can jazz up old Christmas decorations with Das clay using cake decorating moulds to create little clay adornments. These should be fixed to the baubles whilst wet and left to dry in position. When dry you can remove the decorations or fix them permanently with a touch of glue.

You can create decorative bowls and dishes with Das clay. Roll out the clay, lay a stencil over the top and gently run your rolling pin over the top. Carefully peel the stencil off the surface of the clay. Take a bowl and lay it upside down on the clay and cut around it. Remove the bowl and smooth the edges of the clay. Place the clay inside the bowl, shaping it as desired, and leave it to dry.

This clay nightlight was created to decorate a small glass nightlight holder. First some Coarse White Pan Pastel Medium was added to the clay to give it a subtle sparkle. Then it was rolled out and cut into a strip of clay which was wrapped around the glass nightlight. The join was smoothed over using clay tools and drops of water. Mini cookie cutters were used to create the heart and star cutouts before it was left to dry.

For more inspiration check out the Air Dry Clay Pinterest board.
Happy Crafting!
Friday, 4 December 2015
Stampbord crazy!
Well Wednesday was a lot of fun this week (if a little bit of a long day, what with a 5am start...the joys of tv work!). I had a great time with Alex and Charlie though who both had a go at playing with Stampbord...

And here's one of the projects I prepared for the shows...


Step 1. Colour up the Stampbord using the Aqua and Mint Graph'It alcohol pens. Use the blender tool to soften the pen strokes and lighten the colours.


And here's one of the projects I prepared for the shows...
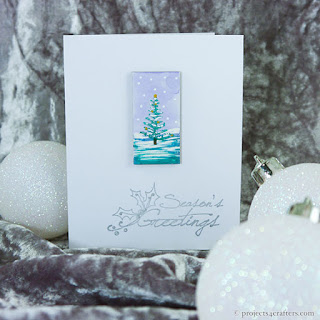
Christmas Tree Card Topper

Material List
Domino sized Stampbord piece
Silver Pan Pastel
Scraper Tools & Sofft Tool
Graph'It Aqua (6110), Mint (7250) & Cappuccino (3125) Pens
Graph'It Blender Pen
Graph'It White, Gold & Glitter Pens
Doobadoo Fern Paper Art
Double-sided Tape, PVA Glue and Card


Step 2. Pick up some silver Pan Pastel on the Sofft tool and brush it across the Stampbord.

Step 3. Cut out one of the small fern paper art pieces.

Step 4. Colour up the fern with the Mint and Cappuccino Graph'It pens.

Step 5. Whilst the fern dries use a scraper tool to scratch some texture in the 'ground'.

Step 6. Stick the fern piece onto the Stampbord with a smear of PVA glue.

Step 7. Add some embellishment to the tree with the white pen for snow, the glitter pen for tinsel and the gold pen for decorations. Add some more white dots in the sky for snow. Use double sided tape to stick the Stampbord to the card. Finish your card off with a stamped sentiment (Premium Craft Brands Winter Spruce Sentiment Stamp used here), diecut or peel off sticker.
This is such a quick and easy Christmas card to make and yet so effective, it's perfect for those last minute panic stations when you realise you've forgotten someone! ;)
As ever, Happy Crafting!
Friday, 27 November 2015
Teaser for the next Hochanda Stampbord Shows...
Hi Everyone,
No blog today I'm afraid as I've run out of time...I'm jetting off to Scotland for the weekend to see a dear friend who's having a bit of a rough time at the moment. I do have just a few moments to remind everyone that I will be doing 3 more Stampbord shows for Hochanda TV, Home of Crafts, Hobbies and Arts, next Wednesday (2nd December 2015). So do please tune in if you can. I believe the shows will be at 10am, 2pm and 6pm (but don't quote me on that as they are still to be confirmed).
Here's some projects you may have seen if you tuned into the earlier shows...


And here's a little teaser of the latest projects I've done in preparation for the show. (Some you will see are not quite complete yet but hopefully will be before the show!) Downloadable project sheets will follow shortly..


Many of these use techniques I've not demonstrated on the tv shows so far so do try and tune in or set your boxes to record... :)
Happy Crafting!
Friday, 20 November 2015
Playing with Stampbord
I've done 2 days of Stampbord Shows on Hochanda TV now which have been fun if a little last minute! I remember buying Stampbord years ago, having a play with it and then tucking it away until I had some really special project to do as I didn't want to waste such a precious resource. I'm so pleased that now, 7 years later, Stampbord has made it back to these shores and at almost half the price it used to be!
I've not had a lot of time to renew my acquaintance with Stampbord yet but what little time I have had has reminded me what a fabulous product it is. Developed by Ampersand Art Supply this incredible art and craft surface allows clean, perfect rubber stamp impressions every time and is correctable and erasable. It has so many uses including jewellery, customising boxes, magnets, altered art, ornaments, card toppers, embellishments and even scrapbooking as it is acid free. The ultra-smooth clay finish accepts all types of inks and no matter how wet you get it it will never warp or buckle. The clay surface also allows you to scratch back into your designs to create highlights and texture which is something you can't do on ordinary cardstock.
So here's the first new project using Stampbord...

Materials needed:
3 x ATC Stampbord
2 x 2" Stampbord Squares
Memento Black Inkpad
Flower Stamp
Acrylic Block
Graph'It Alcohol Pens
Stampbord Scraper Tools
Gold Graph'It Shake Pen
Silver Glitter Graph'It Shake Pen
White 12 x 12 Scrapbook Card
Acid free glue & Super Glue
Fine Embossing Tool
Craft Knife, Ruler & Cutting Mat

Step 1. Ink up the stamp with black Memento ink and stamp it on a square piece of Stampboard. Not all the image will fit on the board so allow the bottom and sides of the stamp to go off the edges.

Step 2. Colour in the stamped image using the Graph'It alcohol ink pens. Use the blender pen to create soft highlights & blend colours.

Step 3. Use the scraper tools to scratch some of the inks away creating brighter highlights on the flowers and leaves.

Step 4. Colour the dots of the stamped image with the gold Shake Graph'It pen.

Step 5. Add dots of silver glitter to the centres of the stars.

Top Tip: If your stamp smudges or your ink bleeds over a line when colouring you can always scratch away imperfections with the scraper tools.

Step 6. Repeat Steps 1-5 for another square piece of Stampbord and two ATC pieces. nb. You will have to stamp the image twice on the larger pieces of Stampbord.

At this point you can take the easy option of covering all the Stampbord elements with separate pieces of card or alternatively you could paint them with acrylic paint before you glue them together using Super Glue.
Alternatively, you can use one piece of card to join all the sides together before sticking them to the base...
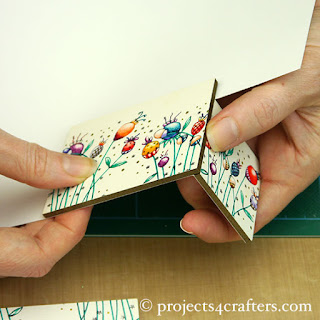
Step 7. Stick a Stampbord square in the corner of the card, making sure that the base of the stamped image is at the edge of the card. Cut the card along the top of the Stampbord piece & score down the side. Fold the card along the score line & stick an ATC Stampbord piece aligned with the front edge of the square.

Step 8. Move the pieces to the edge of your table so you can lay the ATC flat on your cutting mat. Lay another square beside the ATC and cut around the exposed areas of card around the ATC piece.

Step 9. Lay the ATC face down and, using a square piece as a guide, cut along the top edge and score the card down the inside edge.

Step 10. Fold the card along the scoreline. Stick the square Stampbord along the scoreline level with the end of the ATC piece.

Step 11. Again wrap the pieces around the edge of the table so that you can cut along the top of the square piece and score down the side. Stick the last ATC piece in position using a ruler to help line it up along the bottom edge. Cut around it to remove the excess card.

Step 12. Lay the last ATC piece face down and position the first square level with the end. Cut the card on the back of the ATC piece around the top and inside edge of the square.

Step 13. Carefully remove the excess strip of card on the back of the ATC piece.

Step 14. Use Super Glue to stick the edges of the Stampbord together.

Step 15. Use more Super Glue to stick the sides of the pot to the ATC base.
There's lots more inspiration for working with Stampbord available all over the worldwide web including YouTube and Pinterest. Here are a few links to get you started...
The Stampbord website has inspiration and how-to features:
http://www.stampbord.com/idea-gallery.html
The official Facebook page for Stampbord:
https://www.facebook.com/stampbordfans/info/
The Projects4Crafters Stampbord Pinterest board:
https://www.pinterest.com/projects4craft/stampbord/
Stampscapes Stampbord YouTube Videos:
https://www.youtube.com/results?search_query=stampscapes+stampbord
I've not had a lot of time to renew my acquaintance with Stampbord yet but what little time I have had has reminded me what a fabulous product it is. Developed by Ampersand Art Supply this incredible art and craft surface allows clean, perfect rubber stamp impressions every time and is correctable and erasable. It has so many uses including jewellery, customising boxes, magnets, altered art, ornaments, card toppers, embellishments and even scrapbooking as it is acid free. The ultra-smooth clay finish accepts all types of inks and no matter how wet you get it it will never warp or buckle. The clay surface also allows you to scratch back into your designs to create highlights and texture which is something you can't do on ordinary cardstock.
So here's the first new project using Stampbord...
Stampbord Pot

Materials needed:
3 x ATC Stampbord
2 x 2" Stampbord Squares
Memento Black Inkpad
Flower Stamp
Acrylic Block
Graph'It Alcohol Pens
Stampbord Scraper Tools
Gold Graph'It Shake Pen
Silver Glitter Graph'It Shake Pen
White 12 x 12 Scrapbook Card
Acid free glue & Super Glue
Fine Embossing Tool
Craft Knife, Ruler & Cutting Mat


Alternatively, you can use one piece of card to join all the sides together before sticking them to the base...


There's lots more inspiration for working with Stampbord available all over the worldwide web including YouTube and Pinterest. Here are a few links to get you started...
The Stampbord website has inspiration and how-to features:
http://www.stampbord.com/idea-gallery.html
The official Facebook page for Stampbord:
https://www.facebook.com/stampbordfans/info/
The Projects4Crafters Stampbord Pinterest board:
https://www.pinterest.com/projects4craft/stampbord/
Stampscapes Stampbord YouTube Videos:
https://www.youtube.com/results?search_query=stampscapes+stampbord
Friday, 13 November 2015
Christmas Advent Calendar 2015
Well, it may be a week later than expected due to a last minute request to do some Stampbord shows for Hochanda TV but there is still time if you fancy creating your own advent calendar...

You may remember last year's was a felt wall hanging calendar which I created for my youngest nephew Ben (and which I have been asked for again this year...what a surprise, not!) It seems that although he's now football crazy he still has a little time left for Lego, lol!
Well this year I've decided to go for something a little different...

I don't think the photo really does it justice but hopefully you'll get the idea. I've created it using Efco's Star box which comes full of 24 mini star boxes - just perfect for decorating as your own personalised advent calendar. Advent calendars in my day only ever had 24 windows to open as Christmas Day was when you got all your wonderful pressies but these days so many of them seem to have 25. So, if you wanted, you could always use the large box as number 25!
Materials needed:
Papp Art Star Box Set (Efco Art no: 26 346 16)
Light Relief Paste (Efco Art no: 93 162 21)
White Decoupaint (Efco Art no: 93 164 01)
White Rose Napkins (Efco Art no: 16 608 45)
Matt Mod Podge (Efco Art no: 62 113 05)
Yellow & Gold Acrylic Paint
Brushes & Palette Knife
Baby wipes & Soft Brush e.g. old blusher brush
Craft Knife & PVA Glue
Ultra fine Mother of Pearl Glitter (Efco Art no: 91 101 01)
Advent Numbers - I used my Silhouette to cut letters from gold foil and chipboard but you can use whatever you like
Words for the lid - Again I used my Silhouette to cut letters out of chipboard.

Step 1. Remove the back two layers from some napkins and place on one side.

Step 2. Decoupage the sides of a small star box with the top layer of a napkin. Align the edge of the napkin with the top edge of the box and use mat Mod Podge to stick in place.

Step 3. Use a wet brush to create a torn edge, removing the excess napkin from the side and bottom. But do leave a little excess to overlap on the side of the box and wrap around the base.

Step 4. Cover the napkin with a layer of mat Mod Podge to seal it and make sure that all the edges are stuck down. Leave to dry.
Repeat Steps 2-4 for all the other small boxes.

Step 5. Mix Light Relief Paste with some white Decoupaint (2:1).

Step 6. Use a palette knife to roughly spread the mixed paste over the box lids. You want to use just enough paste to block out the brown of the papier maché. Whilst it's still wet sprinkle a little ultra fine glitter in patches over the top and embed a number in the middle. (I cut numbers from thin chipboard and sticky backed gold foil using my latest toy...my Silhouette cutter.) :) Leave to dry.

Step 7. Mix up more paste if necessary and then cover the large star box lid in the same way. Do the edges first so that you can sprinkle a little ultra fine glitter over them before covering the top. Leave to dry.

Step 8. You can decorate the top however you wish. I chose to cut 'When you wish upon a star...' from some more thin chipboard using my Silhouette cutter which I then covered with some more paste and glitter and left to dry.

Step 9. Cut another napkin in strips and use them to cover the edges of the big star box base.

Step 10. When the big box lid is dry (you can speed this up with a hairdryer) use a baby wipe to apply some yellow acrylic in swirly patterns. It will dry very quickly as it is such a thin layer of paint. When dry, use another baby wipe to apply some gold paint over the top. Leave to dry.

Step 11. I used PVA glue to stick the decorated chipboard letters in position on the box lid. I added a little more sparkle by applying more PVA glue in a swirl, following the line of the words, and then covering it with more ultra fine glitter.
When everything is dry brush off the excess glitter from all the boxes using a soft brush e.g. an old blusher brush.
Then all that's left is to fill the little boxes with sweeties, chocolates or little gifts...


I had planned to publish this post this morning but my day went a little haywire with builders, deliveries, a skip removal, and tree surgeons who came to prune our poor neglected apple tree. Anyway I got there in the end and I hope you like this year's advent calendar!
Happy Crafting!

You may remember last year's was a felt wall hanging calendar which I created for my youngest nephew Ben (and which I have been asked for again this year...what a surprise, not!) It seems that although he's now football crazy he still has a little time left for Lego, lol!
Well this year I've decided to go for something a little different...
A Christmas Wish Advent Calendar

I don't think the photo really does it justice but hopefully you'll get the idea. I've created it using Efco's Star box which comes full of 24 mini star boxes - just perfect for decorating as your own personalised advent calendar. Advent calendars in my day only ever had 24 windows to open as Christmas Day was when you got all your wonderful pressies but these days so many of them seem to have 25. So, if you wanted, you could always use the large box as number 25!
Materials needed:
Papp Art Star Box Set (Efco Art no: 26 346 16)
Light Relief Paste (Efco Art no: 93 162 21)
White Decoupaint (Efco Art no: 93 164 01)
White Rose Napkins (Efco Art no: 16 608 45)
Matt Mod Podge (Efco Art no: 62 113 05)
Yellow & Gold Acrylic Paint
Brushes & Palette Knife
Baby wipes & Soft Brush e.g. old blusher brush
Craft Knife & PVA Glue
Ultra fine Mother of Pearl Glitter (Efco Art no: 91 101 01)
Advent Numbers - I used my Silhouette to cut letters from gold foil and chipboard but you can use whatever you like
Words for the lid - Again I used my Silhouette to cut letters out of chipboard.

Step 1. Remove the back two layers from some napkins and place on one side.

Step 2. Decoupage the sides of a small star box with the top layer of a napkin. Align the edge of the napkin with the top edge of the box and use mat Mod Podge to stick in place.

Step 3. Use a wet brush to create a torn edge, removing the excess napkin from the side and bottom. But do leave a little excess to overlap on the side of the box and wrap around the base.

Step 4. Cover the napkin with a layer of mat Mod Podge to seal it and make sure that all the edges are stuck down. Leave to dry.
Repeat Steps 2-4 for all the other small boxes.

Step 5. Mix Light Relief Paste with some white Decoupaint (2:1).


Step 7. Mix up more paste if necessary and then cover the large star box lid in the same way. Do the edges first so that you can sprinkle a little ultra fine glitter over them before covering the top. Leave to dry.

Step 8. You can decorate the top however you wish. I chose to cut 'When you wish upon a star...' from some more thin chipboard using my Silhouette cutter which I then covered with some more paste and glitter and left to dry.

Step 9. Cut another napkin in strips and use them to cover the edges of the big star box base.

Step 10. When the big box lid is dry (you can speed this up with a hairdryer) use a baby wipe to apply some yellow acrylic in swirly patterns. It will dry very quickly as it is such a thin layer of paint. When dry, use another baby wipe to apply some gold paint over the top. Leave to dry.

Step 11. I used PVA glue to stick the decorated chipboard letters in position on the box lid. I added a little more sparkle by applying more PVA glue in a swirl, following the line of the words, and then covering it with more ultra fine glitter.
When everything is dry brush off the excess glitter from all the boxes using a soft brush e.g. an old blusher brush.
Then all that's left is to fill the little boxes with sweeties, chocolates or little gifts...


I had planned to publish this post this morning but my day went a little haywire with builders, deliveries, a skip removal, and tree surgeons who came to prune our poor neglected apple tree. Anyway I got there in the end and I hope you like this year's advent calendar!
Happy Crafting!
Subscribe to:
Posts (Atom)